 This post explains the importance of a heater core flush and how to flush the core yourself. Once you have completed the flush, you wouldnt have to worry about any debris coating your new radiator and would have a clean, free-flowing system from there. But no heat in a Canadian winter is killing me. Thats a major separate task. You should pressurize the heater core for up to ten minutes for the best results. A clogged heater core will prevent the coolant from passing through it, limiting the amount of heat that can be transferred. There are no separate instructions, as the flush would circulate through the heater core, as well as the rest of the cooling system. I just purchased a 32 oz bottle of Blue Devil Radiator flush. For tips on jacking up your vehicle so you can access the firewall, read on! document.getElementById( "ak_js_1" ).setAttribute( "value", ( new Date() ).getTime() ); document.getElementById( "ak_js_2" ).setAttribute( "value", ( new Date() ).getTime() ); Stay in touch with new products, promotions, free stuff and more!
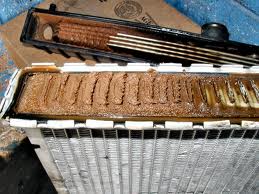
 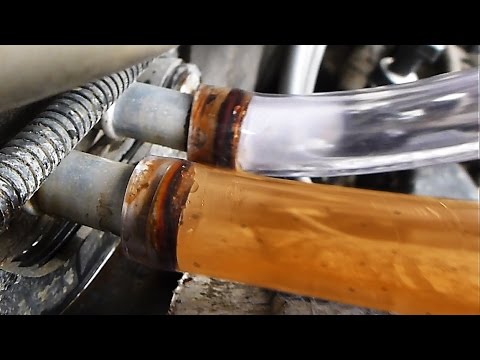 The following are several of the most common symptoms of a clogged heater core. You would be using the Radiator Flushing Agent before applying the BlueDevil Head Gasket Sealer. heater core flush wikihow step Unfortunately, the petcock was clogged, and I dont think the lower radiator hose drains the bottom of the radiator completely (its about 2-inches above the bottom).. After that, I added yellow universal antifreeze and noticed it formed thick brown/black sludge under the radiator cap, and now the car is now running slightly hot. Motor home chassis. Dont forget to flush! I had been leaking ATF for several months but saw no evidence outside the engine, transmission or cooling system. Keep in mind the flush is not acting as antifreeze, so if you are in a colder climate, you would want to get your regular 50/50 mix back in the system to avoid potential freezing. I then purchased so Blue Devil head gasket sealer followed all the directions on the bottle and the head gasket sealed in 15 minutes. I doubt it's been changed in the 20 years of life this car has had. Why wouldnt someone just change the head gasket if they have to remove the intake anyway to get to the thermostat? Another option is to find a body shop thats willing to do the work for you and source the stuff used, from a junkyard. Also, these corrosion inhibitors have a finite life span in your cooling system and after time will start to allow more rapid corrosion to occur. wikiHow marks an article as reader-approved once it receives enough positive feedback. I have a 95 4.0L Ford Aerostar. 2525 18th Street SW, Suite D Put the radiator cap back on, start the engine, put the heat on to the max setting and let the vehicle idle for 10 minutes. I do have a small vacuum leak at the EGR tube to the intake plenum, but nothing too bad. If you have any questions about Irontites products or need a recommendation of which to use, feel free to contact us for our professional opinion. Therefore, it is extremely important to recognize and understand the various symptoms associated with a faulty or obstructed heater core. Youll want to trace them back to the engine. When oil and coolant mix, sludge is created as a byproduct. Never jack up a vehicle on grass, dirt or gravel. If youve never flushed a radiator before or you dont know how to flush a radiator, youve probably got some questions. But thats probably what your mechanic is suggesting that you do now, anyway. Irontite offers some of the best flush and sealant products on the market. The most common symptom of a clogged heater core is a general lack of heat. Required fields are marked *. This would be the best product to remove the brown/blackish sludge you discovered and is intended for deeper cleaning. Can you clean your heater core with Blue Devil Flush if so is there a separate procedure bought a car at auction and the cooling system seems funny. There may have been a few trace amounts of your old coolant still in the block or elsewhere in the cooling system that was not removed during the initial flush. Once all the water has drained, you can use the air compressor to get rid of any excess water. What is best way to flush this out? I was using pink coolant and they switched to green. Repeat this several times and it will usually increase the efficiency of the heater core for a bit. Maybe youve taken your car in for some recent service and the mechanic let you know you needed a cooling system flush. I have a 1995 Pontiac Firebird with the 3.4L V6. The other thing wed recommend doing is taking measurement readings using a trusted instrument, like a inferred thermometer, at your radiator, near the thermostat housing and other places around your engine to make sure it isnt your vehicles temperature gauge that is malfunctioning. Based on your description, it does seem like it would be beneficial to leave the flush in a little longer, driving it intermittently over the course of a week or so. If you use water from your tap to mix with your antifreeze, you are adding a whole new spectrum of chemicals to your coolant, many of which can be harmful to your vehicle. core heater radiator acm Thanks. A heater core is a heat exchanger that radiates heat into a vehicles cabin. However, when combined with additional issues, engine overheating may result. Thanks for your question. However, heat exchangers found within this system are especially prone to problems resulting from rust and scale build-up. Here are engine coolant system problems your car might have at some point. This will help to prevent the build-up of dirt, debris, and rust particles in the narrow passageswhich ultimately causes clogs and damage. Yes, you can use BlueDevil Radiator Flush to obtain a more extensive cleaning of the cooling system. Last Updated: September 9, 2021 Youll want to catch it all and dispose of it appropriately since its bad for the environment. Add BlueDevil Radiator flush to your radiator, then refill the cooling system with water. Im using this on a 1963 Studebaker. To further my investigation I watched the water at the radiator cap to make sure it was not fountaining which could indicate a combustion leak which would put combustion gases in my coolant system as well as oil. If the hoses are old, and perhaps contaminates are covering up weak spots or areas of deterioration, flushing the system would remove those contaminates and allow water loss at those weak spots. Level up your tech skills and stay ahead of the curve. You will need to use a water hose to flush the system either way, but compressed air may move harder to break blockages. audi heater core Most modern vehicles require instremement panel removal to install them. Hello, I plan to replace my hoses and do the flush in my Workhorse G.M.
 heater core passat flush plugged Plus my garden hose is probably frozen. BlueDevil Radiator flush has a concentrated formula with powerful cleaning agents designed to remove any gunk or scale from your cooling system without damaging any of the components. Most shops charge for the number of labor hours specified by a vehicles manufacturer when completing repairs. To make sure I did not have oil in the coolant I checked the oil indicator stick, spark plugs and drained oil as it was time for an oil change. But how did all the gunk get into to your radiator, the cap has been on tight for years so there shouldnt be any way for contamination to get in there right? In certain cases, heater core replacement can require as much as 7-8 hours of labor. By signing up you agree to our privacy policy, Stand with us in our mission to discover and uncover the story of North Texas. This is often the case when cooling system efficiency is already compromised, such as in the case of a faulty water pump or a partially clogged radiator. 9/10 times it doesn't clear the clog, and just degrades the system somewhere else. (and Average Installation Cost). I had a coolant flush at a local repair shop. Most recent flush does not have globs of ATF but water is still cloudy with smaller amounts of ATF. radiator bad Thank you for asking about your Buick Century.
 Once everything has cooled, recheck the coolant level in your radiator and overflow reservoir and fill them to the recommended level. Youll want to make sure that you hook it up to the outlet hose and seal it with a coupler or some duct tape. A subReddit for Auto, Car, and Truck repair questions and discussion, Press J to jump to the feed. Once youve located the heater core and the hoses, disconnect them from the firewall. In any event, it costs significantly less to flush a heater core, than it does to replace the affected heater core in its entirety. If youre having trouble, refer to your owners manual. I have concluded that the ATF is in suspension despite days of flushing the system. To help remove any buildup in the system we recommend running a bottle of the BlueDevil Radiator Flush through the system to help remove anything that may be causing a reduction in flow. To flush a heater core, locate the heater core on the vehicles firewall, loosen the clamps, and disconnect the heater hoses.
  Please contact us at 888-863-0426 and we would be happy to help you out. Once youve removed the clamps and hoses, the coolant will begin to leak out. You would need to drain the cooling system of antifreeze and simply add water to run with the BlueDevil Radiator Flush. Perhaps I'll just ask the shop to diagnose the heat issue and go from there.
  Its a good idea to have extra clamps on hand in case the old ones break.
  heater core flush hose buick garden century replacement 1996 ford dodge 2004 heat repair clogged explorer diy That's what I did. If there is a serious blockage in the line, pressure may leak back out the hose rather than penetrating the clog. This sludge quickly spreads throughout a vehicles cooling system, including the heater core. This may be a better option for your vehicle. Make sure both hoses are attached and clamped before removing the radiator hose block off clamps. What do you think? In terms of performing a radiator flush, it is not super important to run the heater, however, doing so would allow the flushing agent to go in through the heater core to remove any possible build up. Be sure the container you choose does not leak and preferably can be sealed to transport the coolant to a recycling center. I got the feeling im clogged in the motor itself, is this product a strong cleaner? can I do my flushing with water from a hose and then after all that is done .. after Im getting clean water .. can I then use distilled water to flush the tap water residue out and then fill using 50-60% (of coolant capacity) full strength AF topping off with distilled. What are you driving? When flushing the radiator, if the heat is on, the flush would circulate through the heater core. You can do it yourself with a handful of quarters! However, we do have a product called the BlueDevil Pour N Go Head Gasket Sealer that is an easy-to-use formula and does not require the removal of thermostat or a flush prior to use. It may take a number of hours for an engine to cool completely. yellow label). Heres what youll need to get started: *An air compressor isnt 100% obligatory, however, it is extremely helpful in loosening up any gunk before performing the flush.
  Thanks again for your question! Now, heres how to perform a heater core flush: First things first. http://www.popularmechanics.com/cars/how-to/a3270/whats-wrong-with-my-cars-heater-16078844/, http://www.myhonestmechanic.com/articles/do-i-need-a-heater-core-flush.shtml, https://www.youtube.com/watch?v=M9SIafVsqyc, https://www.dummies.com/home-garden/car-repair/how-to-safely-jack-up-your-vehicle/, Lavare il Radiatore di Riscaldamento dell'Abitacolo. Read on to learn more about the symptoms of a clogged heater core, as well as what to do in the event that you encounter such issues in the future.
  Based on your description, it sounds like your vehicle may be getting combustion/exhaust gases blowing into the cooling system and creating pressure. Once your cooling system is empty, close the drains as before. So Im thinking the constancy of the antifreeze with the trapped rust in the bottom is turning to mud and clogging the radiator? It's a temp fix though.
 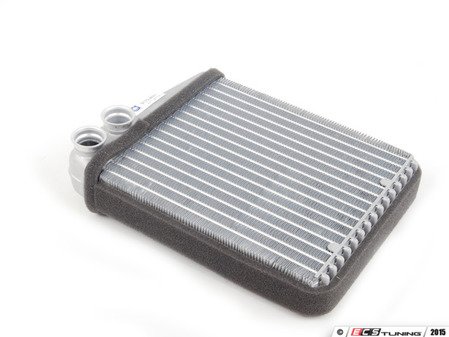 I dont want to compromise my new one with junk in the engine itself. heater core cooling removing heatercore flush without way radiator bonnie partially clogged apparent seems takes hours since previous Pictures courtesy of: www.cherokeeforum.com, autolistinc.com and mike-thompson.com. Feel free to contact our technical support line at 888-863-0426 with any other questions. Read more here. refroidissement clogged problmes
 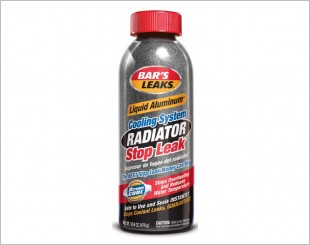 Start your vehicle and let the engine idle for 15 to 30 minutes depending on how much long it has been since your last coolant flush. Anywho, will this unclog my core or do I specifically have to request this? This is especially true when more than the recommended amount of such products are used. This will allow the coolant to flow and can help identify if theres a clog. Place a drain bucket underneath the heater core hoses. to wit always flush before replacing said item. There are numerous symptoms that often accompany the presence of a clog within a vehicles heater core. Do you have any suggestions? Based on your description, we recommend using the BlueDevil Radiator Flush & Oil Degreaser, found here on our website: (https://gobdp.com/product/radiator-flush-oil-degreaser/). Leave the hose or airline running for a few minutes to ensure it pressurizes the entire system. This is due to the significant amount of time that is required to replace most heater cores and the labor cost that such an expenditure of time commands. {"smallUrl":"https:\/\/www.wikihow.com\/images\/thumb\/5\/53\/Flush-a-Heater-Core-Step-1-Version-2.jpg\/v4-460px-Flush-a-Heater-Core-Step-1-Version-2.jpg","bigUrl":"\/images\/thumb\/5\/53\/Flush-a-Heater-Core-Step-1-Version-2.jpg\/aid787864-v4-728px-Flush-a-Heater-Core-Step-1-Version-2.jpg","smallWidth":460,"smallHeight":345,"bigWidth":728,"bigHeight":546,"licensing":"
License: Creative Commons<\/a> License: Creative Commons<\/a> License: Creative Commons<\/a> License: Creative Commons<\/a> License: Creative Commons<\/a> License: Creative Commons<\/a> License: Creative Commons<\/a> License: Creative Commons<\/a> License: Creative Commons<\/a> License: Creative Commons<\/a>
\n<\/p>
\n<\/p><\/div>"}, {"smallUrl":"https:\/\/www.wikihow.com\/images\/thumb\/b\/bc\/Flush-a-Heater-Core-Step-2-Version-2.jpg\/v4-460px-Flush-a-Heater-Core-Step-2-Version-2.jpg","bigUrl":"\/images\/thumb\/b\/bc\/Flush-a-Heater-Core-Step-2-Version-2.jpg\/aid787864-v4-728px-Flush-a-Heater-Core-Step-2-Version-2.jpg","smallWidth":460,"smallHeight":345,"bigWidth":728,"bigHeight":546,"licensing":"
\n<\/p>
\n<\/p><\/div>"}, {"smallUrl":"https:\/\/www.wikihow.com\/images\/thumb\/b\/bf\/Flush-a-Heater-Core-Step-3-Version-2.jpg\/v4-460px-Flush-a-Heater-Core-Step-3-Version-2.jpg","bigUrl":"\/images\/thumb\/b\/bf\/Flush-a-Heater-Core-Step-3-Version-2.jpg\/aid787864-v4-728px-Flush-a-Heater-Core-Step-3-Version-2.jpg","smallWidth":460,"smallHeight":345,"bigWidth":728,"bigHeight":546,"licensing":"
\n<\/p>
\n<\/p><\/div>"}, {"smallUrl":"https:\/\/www.wikihow.com\/images\/thumb\/3\/3a\/Flush-a-Heater-Core-Step-4-Version-2.jpg\/v4-460px-Flush-a-Heater-Core-Step-4-Version-2.jpg","bigUrl":"\/images\/thumb\/3\/3a\/Flush-a-Heater-Core-Step-4-Version-2.jpg\/aid787864-v4-728px-Flush-a-Heater-Core-Step-4-Version-2.jpg","smallWidth":460,"smallHeight":345,"bigWidth":728,"bigHeight":546,"licensing":"
\n<\/p>
\n<\/p><\/div>"}, {"smallUrl":"https:\/\/www.wikihow.com\/images\/thumb\/7\/73\/Flush-a-Heater-Core-Step-5-Version-2.jpg\/v4-460px-Flush-a-Heater-Core-Step-5-Version-2.jpg","bigUrl":"\/images\/thumb\/7\/73\/Flush-a-Heater-Core-Step-5-Version-2.jpg\/aid787864-v4-728px-Flush-a-Heater-Core-Step-5-Version-2.jpg","smallWidth":460,"smallHeight":345,"bigWidth":728,"bigHeight":546,"licensing":"
\n<\/p>
\n<\/p><\/div>"}, {"smallUrl":"https:\/\/www.wikihow.com\/images\/thumb\/a\/a6\/Flush-a-Heater-Core-Step-6-Version-2.jpg\/v4-460px-Flush-a-Heater-Core-Step-6-Version-2.jpg","bigUrl":"\/images\/thumb\/a\/a6\/Flush-a-Heater-Core-Step-6-Version-2.jpg\/aid787864-v4-728px-Flush-a-Heater-Core-Step-6-Version-2.jpg","smallWidth":460,"smallHeight":345,"bigWidth":728,"bigHeight":546,"licensing":"
\n<\/p>
\n<\/p><\/div>"}, {"smallUrl":"https:\/\/www.wikihow.com\/images\/thumb\/f\/f0\/Flush-a-Heater-Core-Step-7-Version-2.jpg\/v4-460px-Flush-a-Heater-Core-Step-7-Version-2.jpg","bigUrl":"\/images\/thumb\/f\/f0\/Flush-a-Heater-Core-Step-7-Version-2.jpg\/aid787864-v4-728px-Flush-a-Heater-Core-Step-7-Version-2.jpg","smallWidth":460,"smallHeight":345,"bigWidth":728,"bigHeight":546,"licensing":"
\n<\/p>
\n<\/p><\/div>"}, {"smallUrl":"https:\/\/www.wikihow.com\/images\/thumb\/3\/3d\/Flush-a-Heater-Core-Step-8-Version-2.jpg\/v4-460px-Flush-a-Heater-Core-Step-8-Version-2.jpg","bigUrl":"\/images\/thumb\/3\/3d\/Flush-a-Heater-Core-Step-8-Version-2.jpg\/aid787864-v4-728px-Flush-a-Heater-Core-Step-8-Version-2.jpg","smallWidth":460,"smallHeight":345,"bigWidth":728,"bigHeight":546,"licensing":"
\n<\/p>
\n<\/p><\/div>"}, {"smallUrl":"https:\/\/www.wikihow.com\/images\/thumb\/7\/7a\/Flush-a-Heater-Core-Step-9.jpg\/v4-460px-Flush-a-Heater-Core-Step-9.jpg","bigUrl":"\/images\/thumb\/7\/7a\/Flush-a-Heater-Core-Step-9.jpg\/aid787864-v4-728px-Flush-a-Heater-Core-Step-9.jpg","smallWidth":460,"smallHeight":345,"bigWidth":728,"bigHeight":546,"licensing":"
\n<\/p>
\n<\/p><\/div>"}, {"smallUrl":"https:\/\/www.wikihow.com\/images\/thumb\/2\/2f\/Flush-a-Heater-Core-Step-10.jpg\/v4-460px-Flush-a-Heater-Core-Step-10.jpg","bigUrl":"\/images\/thumb\/2\/2f\/Flush-a-Heater-Core-Step-10.jpg\/aid787864-v4-728px-Flush-a-Heater-Core-Step-10.jpg","smallWidth":460,"smallHeight":345,"bigWidth":728,"bigHeight":546,"licensing":"
\n<\/p>
\n<\/p><\/div>"}, {"smallUrl":"https:\/\/www.wikihow.com\/images\/thumb\/6\/62\/Flush-a-Heater-Core-Step-11.jpg\/v4-460px-Flush-a-Heater-Core-Step-11.jpg","bigUrl":"\/images\/thumb\/6\/62\/Flush-a-Heater-Core-Step-11.jpg\/aid787864-v4-728px-Flush-a-Heater-Core-Step-11.jpg","smallWidth":460,"smallHeight":345,"bigWidth":728,"bigHeight":546,"licensing":"