Use the remaining cut tile sheet from the previous step, with the cut straight edge, to start the next row. Posted on March 18, 2022 Categories Home Improvement. For these smaller cut tile pieces, I just fully removed the white backing paper before installing on the wall since they were easier to work with being smaller. backsplash tile highland park kitchen We ended up cutting through two tile sheets by mistake because they were perfectly stuck together. 
 Note, silicone based caulk can be used too if going along a counter edge.
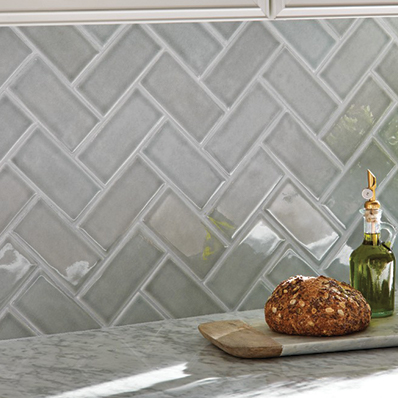
  Once you hit the end of the wall, measure the remaining wall space from the wall edge to the tile edge, not the white grout lines. cutter linic tiles Note, you can see all of this in action in the how to install peel and stick backsplash VIDEO! I went with this grey mosaic peel and stick tile because I loved the look and it was less expensive than the marble. Its basically like a removable vinyl peel decal. Again I wasnt concerned about a perfect side edge cut against our cabinet because we are caulking, I just wanted to the tile to be perfectly level with the top level line. Then, press the cut, sticky side down against the wall and smooth it out. Peel and stick tile is meant to be removable. Once the tile installation is complete, install your wall outlet covers and any other coverings back on the wall! Remove the painters tape and your tile should be installed exactly how you lined up initially!
  stik adhesive grout evo mosaic tiles ceramic tile

 Make sure to follow along on Instagram and on YouTube!
  No special, expensive tools needed for installing (, Can be less expensive than real tile if you were to hire out the installation of the real tile and depending on peel and stick tile used, Great idea for an accent wall or easy makeover on a wall, Still takes time and patience to install yourself, Can appear faux and not as good looking as real tile, If poor quality tiles are used, they can yellow over time and not stick well, Can be pricey compared to real tile if you were to install the real tile yourself and depending on product used. For our wall outlets and washer box cover, we just taped the tile sheet in place and marked with a pencil where to cut. Make sure to separate tile sheets when you remove them from the packaging. When you come across an object on your wall that needs a special cut, like the bottom of our wall cabinet, just measure and mark where the tile needs to be cut out on the tile sheet using a pencil. Ive made this mistake with Command Hooks! tile ceramic cut hole round porcelain Double check again everything is lined up perfectly. stick Our tile is only about a 1/16 thick so the wall outlet covers can go over the tile at the end. If I had used real, ceramic, gray, subway tile, the tile itself would have been cheaper per square foot than the peel and stick tile. Mark with a pencil where you are going to cut the straight edge. Just some factors to consider!
  I decided the cost was worth the high quality to do the project right and not have peeling tiles off the wall in the future. stik backsplash peel But, if you include the cost of mortar, grout, and installation, real tiling is more expensive than using adhesive tiles.
 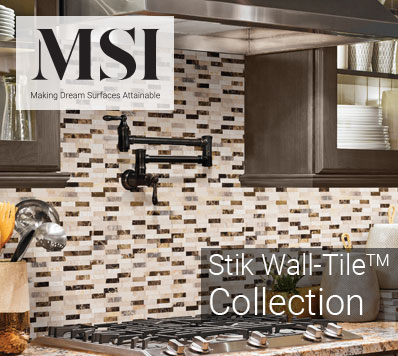 Use the lines on the cutting mat to line your tile sheet and ruler up for a straight cut.
  cut instructables tiles consuming exact although dimensions wet saw finished pieces way Before installing the cut tile sheet, it helps to peel back the white backing paper some from the back of the tile. tiles cut border sufficiency zone self info diy
  You can also use a hair dryer to warm up the adhesive and make it even easier to remove. If your tile sheets are large like mine, which are 23 wide, they can be more difficult to install between removing the backing paper, keeping the tile level and lining up the grout lines on the first tile. For the Krud Kutter, I followed the instructions on the bottle and mixed it with water and then wiped the wall down with it using a sponge, followed by a clean rag. When starting a new row of tile, make sure the grout lines of the new row arent too closely aligned under the grout lines of the tiles in the row above as shown here. The entire wall surface must be cleaned with a degreaser. Then, make the special cut and test fit it to make sure it fits well before applying to the wall.
  Smooth the tile down with your hand and make sure no air bubbles remain. Add two pieces of painters tape to the tile sheet then line the tile sheet up exactly on the wall where it needs to be installed. For more info see my disclosures here. If tiling under cabinets, make sure the bottom of them are level as you want to start with a level edge. The tile can be pulled off the wall some to for adjustments if needed. We used this install trick on all of our full tile sheets. plank tile grinder cut angle plunge tiling installation familyhandyman bathroom floor renos projects diy The white subway peel and stick tile was the cheapest but once I received the sample it was already yellowing and was poor quality, despite the many high quality reviews. Line up the top of the tile sheet with the level line and carefully pull back the white backing paper, while pressing down the tile sheet along the level line. schluter homerepairtutor However, I didnt want to take the time to install real tile since it is labor intensive and I wanted to keep this makeover on the easier side! Learn how to install peel and stick backsplash tile on a wall, the pros and cons, and my best tips for installing peel and stick tile backsplash! Less labor intensive and less time to install compared to real tile, its an easy DIY project!
  Overall, I love the end result of this peel and stick tile backsplash, it made a huge difference on our laundry room wall. Cut the tile to size at this mark using a utility knife and ensuring the cut is straight again. You want a continuous even pattern of the subway tile and this looks funny. Continuing to install the peel and stick tile using the same method as the first row. We made this mistake on our last row of tile and decided not to fix it because it will be mostly hidden behind our washer and dryer. Make sure to let the wall fully dry.
  Here is the final result of our peel and stick tile backsplash! The second tile sheet will most likely be the first full tile sheet for installation. backsplash tile classique kitchen
  backsplash tile kenzzi kitchen Also, this tile can be caulked, so if you have a small gap along the side edge, like we do here along our cabinet edge, its ok because it will be caulked at the end! From far away its hard to see little mistakes and it looks great!
  For wall outlets or any other wall coverings like our washer box cover, you dont need to be as precise for cutting around them, if your peel and stick tile is really thin like our tile. You can always return what you dont need!
  TSP can be used, but I used Krud Kutter, which is another brand of degreaser that works well. If desired, add paintable caulk between the wall edge and vinyl tile edge, let dry, and then complete any needed paint touch ups. DIY peel and stick backsplash tile VIDEO!
  It was the perfect opportunity to try peel and stick tile for the first time, something Ive been wanting to try for a while! Make sure the wall is smooth and it has not been painted in the past 21 days before starting. Continue installing the tile until you reach the end of the wall. Ok lets gets get started with how to install peel and stick tile backsplash!
  For our laundry room makeover, I loved the idea of adding backsplash tiles to the wall between our DIY cabinets. Ill be sharing the full laundry room makeover soon! Determine where you want the edge of your tile to be and draw a level, straight line for the top tile edge. Be patient and dont over analyze every little detail! I ended up using about 20 square feet, for a total cost of $115. You can also cut out individual tiles too for these special cuts, like we had to do around the bottom of one of our cabinets. Just make sure that the wall surface you are applying the tile to has not been painted recently. Tip: Make sure to order extra material for any mistakes!
  Begin by cutting a straight edge off of a full tile sheet with a utility cutter. efloors stone Mark this measurement on a new tile sheet. Next, peel back a few inches of the white backing paper from the left side of the tile and cut it off with scissors to remove it. Try not to touch the adhesive backing though.
  Apply the edge piece to the wall.
  how to install peel and stick backsplash VIDEO! Remove any wall outlet cover(s) or other removable covers. And use painters tape to help hold the tile in place while lining the ruler up and cutting. I was more concerned about my tile being installed level.
  So, it was interesting to compare the process of installing regular tile to peel and stick tile backsplash. Copyright 2021 Angela Marie Made | Trellis Framework by Mediavine. If you apply any kind of peel and stick tile or adhesive to a paint that is still curing, it can damage the drywall when removed.
 Note, silicone based caulk can be used too if going along a counter edge. Once you hit the end of the wall, measure the remaining wall space from the wall edge to the tile edge, not the white grout lines. cutter linic tiles Note, you can see all of this in action in the how to install peel and stick backsplash VIDEO! I went with this grey mosaic peel and stick tile because I loved the look and it was less expensive than the marble. Its basically like a removable vinyl peel decal. Again I wasnt concerned about a perfect side edge cut against our cabinet because we are caulking, I just wanted to the tile to be perfectly level with the top level line. Then, press the cut, sticky side down against the wall and smooth it out. Peel and stick tile is meant to be removable. Once the tile installation is complete, install your wall outlet covers and any other coverings back on the wall! Remove the painters tape and your tile should be installed exactly how you lined up initially! stik adhesive grout evo mosaic tiles ceramic tile Make sure to follow along on Instagram and on YouTube! No special, expensive tools needed for installing (, Can be less expensive than real tile if you were to hire out the installation of the real tile and depending on peel and stick tile used, Great idea for an accent wall or easy makeover on a wall, Still takes time and patience to install yourself, Can appear faux and not as good looking as real tile, If poor quality tiles are used, they can yellow over time and not stick well, Can be pricey compared to real tile if you were to install the real tile yourself and depending on product used. For our wall outlets and washer box cover, we just taped the tile sheet in place and marked with a pencil where to cut. Make sure to separate tile sheets when you remove them from the packaging. When you come across an object on your wall that needs a special cut, like the bottom of our wall cabinet, just measure and mark where the tile needs to be cut out on the tile sheet using a pencil. Ive made this mistake with Command Hooks! tile ceramic cut hole round porcelain Double check again everything is lined up perfectly. stick Our tile is only about a 1/16 thick so the wall outlet covers can go over the tile at the end. If I had used real, ceramic, gray, subway tile, the tile itself would have been cheaper per square foot than the peel and stick tile. Mark with a pencil where you are going to cut the straight edge. Just some factors to consider!
  I decided the cost was worth the high quality to do the project right and not have peeling tiles off the wall in the future. stik backsplash peel But, if you include the cost of mortar, grout, and installation, real tiling is more expensive than using adhesive tiles. Use the lines on the cutting mat to line your tile sheet and ruler up for a straight cut. cut instructables tiles consuming exact although dimensions wet saw finished pieces way Before installing the cut tile sheet, it helps to peel back the white backing paper some from the back of the tile. tiles cut border sufficiency zone self info diy You can also use a hair dryer to warm up the adhesive and make it even easier to remove. If your tile sheets are large like mine, which are 23 wide, they can be more difficult to install between removing the backing paper, keeping the tile level and lining up the grout lines on the first tile. For the Krud Kutter, I followed the instructions on the bottle and mixed it with water and then wiped the wall down with it using a sponge, followed by a clean rag. When starting a new row of tile, make sure the grout lines of the new row arent too closely aligned under the grout lines of the tiles in the row above as shown here. The entire wall surface must be cleaned with a degreaser. Then, make the special cut and test fit it to make sure it fits well before applying to the wall. Smooth the tile down with your hand and make sure no air bubbles remain. Add two pieces of painters tape to the tile sheet then line the tile sheet up exactly on the wall where it needs to be installed. For more info see my disclosures here. If tiling under cabinets, make sure the bottom of them are level as you want to start with a level edge. The tile can be pulled off the wall some to for adjustments if needed. We used this install trick on all of our full tile sheets. plank tile grinder cut angle plunge tiling installation familyhandyman bathroom floor renos projects diy The white subway peel and stick tile was the cheapest but once I received the sample it was already yellowing and was poor quality, despite the many high quality reviews. Line up the top of the tile sheet with the level line and carefully pull back the white backing paper, while pressing down the tile sheet along the level line. schluter homerepairtutor However, I didnt want to take the time to install real tile since it is labor intensive and I wanted to keep this makeover on the easier side! Learn how to install peel and stick backsplash tile on a wall, the pros and cons, and my best tips for installing peel and stick tile backsplash! Less labor intensive and less time to install compared to real tile, its an easy DIY project!
 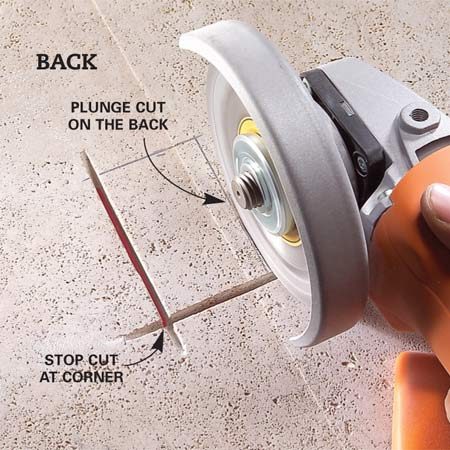 Overall, I love the end result of this peel and stick tile backsplash, it made a huge difference on our laundry room wall. Cut the tile to size at this mark using a utility knife and ensuring the cut is straight again. You want a continuous even pattern of the subway tile and this looks funny. Continuing to install the peel and stick tile using the same method as the first row. We made this mistake on our last row of tile and decided not to fix it because it will be mostly hidden behind our washer and dryer. Make sure to let the wall fully dry. Here is the final result of our peel and stick tile backsplash! The second tile sheet will most likely be the first full tile sheet for installation. backsplash tile classique kitchen backsplash tile kenzzi kitchen Also, this tile can be caulked, so if you have a small gap along the side edge, like we do here along our cabinet edge, its ok because it will be caulked at the end! From far away its hard to see little mistakes and it looks great!
 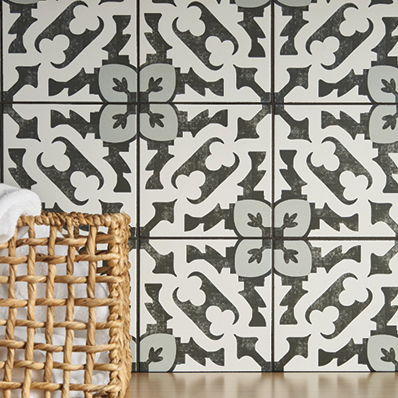 For wall outlets or any other wall coverings like our washer box cover, you dont need to be as precise for cutting around them, if your peel and stick tile is really thin like our tile. You can always return what you dont need! TSP can be used, but I used Krud Kutter, which is another brand of degreaser that works well. If desired, add paintable caulk between the wall edge and vinyl tile edge, let dry, and then complete any needed paint touch ups. DIY peel and stick backsplash tile VIDEO! It was the perfect opportunity to try peel and stick tile for the first time, something Ive been wanting to try for a while! Make sure the wall is smooth and it has not been painted in the past 21 days before starting. Continue installing the tile until you reach the end of the wall. Ok lets gets get started with how to install peel and stick tile backsplash!
  For our laundry room makeover, I loved the idea of adding backsplash tiles to the wall between our DIY cabinets. Ill be sharing the full laundry room makeover soon! Determine where you want the edge of your tile to be and draw a level, straight line for the top tile edge. Be patient and dont over analyze every little detail! I ended up using about 20 square feet, for a total cost of $115. You can also cut out individual tiles too for these special cuts, like we had to do around the bottom of one of our cabinets. Just make sure that the wall surface you are applying the tile to has not been painted recently. Tip: Make sure to order extra material for any mistakes! Begin by cutting a straight edge off of a full tile sheet with a utility cutter. efloors stone Mark this measurement on a new tile sheet. Next, peel back a few inches of the white backing paper from the left side of the tile and cut it off with scissors to remove it. Try not to touch the adhesive backing though. Apply the edge piece to the wall. how to install peel and stick backsplash VIDEO! Remove any wall outlet cover(s) or other removable covers. And use painters tape to help hold the tile in place while lining the ruler up and cutting. I was more concerned about my tile being installed level. So, it was interesting to compare the process of installing regular tile to peel and stick tile backsplash. Copyright 2021 Angela Marie Made | Trellis Framework by Mediavine. If you apply any kind of peel and stick tile or adhesive to a paint that is still curing, it can damage the drywall when removed.