The wood being cut above was actually for the farmhouse table I built, but you get the idea.  I will be tackling a similar project soon and was concerned about this. Trim of any type makes cabinet doors appear expensive. This is typically done for affordability on fir plywood doors or cheaper shop birch plywood doors but can also be used on oak, ash, or any other hardwood. Ive been painting my old oak kitchen cabinets. Once your cabinet and drawer fronts and frames are dry (after at least 24 hours from your last coat of paint), its time to finally re-attach them! Sand the fronts of your doors. That made it really easy to re-assemble everything and made sure nothing got lost or mixed up! Hi Jess! Make these calculations until you have accounted for every length and width measurement of the cabinets and drawers. Typical 90-degree raised molding is usually at least 1 inch tall sometimes taller with a rounded profile. Or did the glue do a good enough job to make sure there were no gaps? document.getElementById( "ak_js" ).setAttribute( "value", ( new Date() ).getTime() ); 2021 BREPURPOSED. They will let you know if you didnt attach them properly . trim kitchen cabinets cabinet adding molding under bottom grade updating builder twine tidbits moulding doors lighting upper 80s space fixtures
  Then you can place it back down on the sawhorse and roll the last side thats facing you. As soon as I finish the boxes, the doors go back on. I just moved into this new home so Im finding a way wherein I can redecorate everything according to my budget. So getting it right is important. You need to have your own show on DIY or HGTV. If you dont have a table saw, find a handyman and pay him to cut them with a proper table saw. I learned this the hard way, 10) Remove cabinet & drawer fronts and remove hinges from cabinet bases. What a transformation. Have the doors and drawer fronts all finished but have the boxes yet to finish. vintagemellie trim doors cabinet adding flat plain update
  Anyone can add value to cabinet doors with the right trim and clean, tight-fitting mitered corners. I do NOT recommend using Annie Sloan Chalk Paint. Trim molding consist of two types: one has a 90-degree lip to fit on edges and the other lays flat on the face of the door. Once they are all painted and drying, its time to prime the bases / frames of your cabinets and drawers. It makes the door appear ornate and expensive. You can lay out your trim on your doors once youve cut them, then I went back and sanded down the edges so everything was smooth. Our local Home Depot/Lowes wouldnt cut pieces that small for us, but I know some do, so its worth asking if you dont have access to a table saw of your own. It Orans even look like the same room! This is a challenge to do as one person, but it can be done, because I did it all by myself! Add glue, and pin nail it. Sand the puddy down once dry. I chose 4 width for all the cabinets, and 2 width for the drawers. Bre, what an awesome job you did. Hope that helps! I found overnight to be fine. I just repainted my cabinets using semi-gloss paint, and I love it! I used Valspar Reserve in the color Du Jour because thats what I had left over from our walls. cabinet doors kitchen flat trim adding cabinets door molding shaker moulding Cut your trim pieces. doors kitchen raised cabinet panel door trim cupboard cabinets diy adding cupboards molding moulding profile pine frame dzine around network Pin nails make a tiny hole that is easily filled with putty. I love how yours turned out, thank you for sharing! Follow the instructions on dry time for this. Tight space All that hard work paid off in spades my friend!!! Painting alone can make a big difference but the trim takes them to another level and helps modernize them even more. Im not sure if youll see this, but I was wondering how the glue is holding up all this time later.
 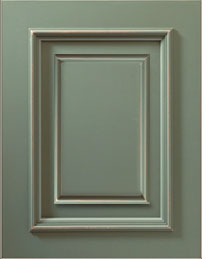 Ha it was really nice to have everything readily available!
  Love, love, love the pulls and knobs! hometalk Prime!
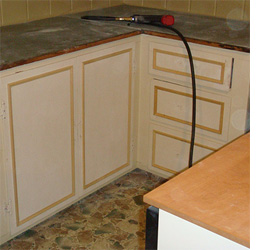
  Start by cutting 1/4-inch by 13/16-inch strips of hardwood to match the species of the door. Paint is amazing. Im going to break this down into steps and be as thorough as possible for you. glue harder kitchen trim cabinets moulding doors adding plain dzine upgrades easy thin around above za remodel edge pine Let them cure. I used, Caulking timeall around the inner rectangle, where the trim meets the cabinet. Once your pieces of wood are fully adhered and cured onto the cabinet fronts, its time to caulk the gaps to seal the space between the cabinet front and trim which will protect your trim from water or grime loosening the adhesive. Then I used my roller for the rest of it. If youve been thinking about overhauling your kitchen with something big like trimming your cabinets, or maybe just painting them (which is still a ton of work!) Get your drill, and using a drill bit that is the same width as the screws on your knobs, drill a hole through the cabinet or drawer (make sure you dont drill through the cabinet frame). This look is subtle yet still adds woodworking charm to the door. (SKIP STEPS 7-13 IF YOU ARENT ADDING TRIM). This of course will work on wood cabinets as well, but a few of the steps might vary. Use the drill to screw one screw into the top part of the cabinet and then screw another into the bottom part.
 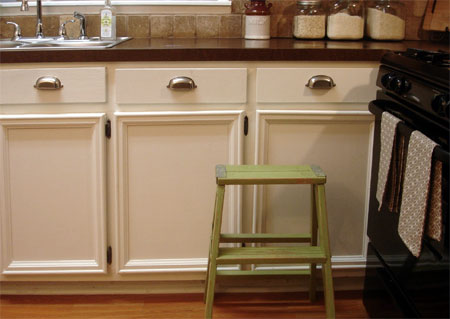 It takes seconds to dry and holds SO well. I followed the same process of using my paintbrush first to get the inside border, then used my roller for the rest. Flat backed molding is installed around the perimeter on the face of the door, typically 2 inches from the edges on all four sides. Flat-backed molding can be cut from the short or long points of the miter whatever is more convenient. Thanks so much! cabinet kitchen adding doors trim redo door plain diy cabinets refinish shaker refacing moulding never convert ending quest Again, I found I got the best results with my palm sander. Take your pieces of wood home, and use a yardstick to measure off the lengths of the individuals pieces of wood you need to cut. Then, hold your cabinet front up, and screw it back in. Miter saws are user-friendly and safer than table saws. Go to Home Depot, and buy wood. Where did you get the gold hardware from? At Home Depot its free if you hire a handyman or have a woodworking club nearby, youll have to pay a fee. without the trim I hope this guide helps you figure out a process that works for you and enables you to take the leap of faith and get stuck in! If satisfied with the fit, add glue to the back of the molding, instructs Two Feet First. I have the paint kit already, just trying to figure out the wood trim and cabinet hardware. Make sure you do this correctly, otherwise your cabinet wont attach properly, haha. Looking amazing. I went to Home Depot today and they said that if I put wood trim that was 1/4 inch thick (like listed above), if we drilled handles into the trim, the wood trim would split. I used two kinds of paint: Glidden Duo Satin finish in Benjamin Moore Revere Pewter, and Annie Sloan Chalk Paint in Pure White. Depending on how close your trim is, you might only have to do this once, but I did it twice most times to make sure it was super smooth.
 Then it should just be a matter of placing your knobs or pulls over the holes and securing them from the inside of the cabinet or drawer with the nut and washer they came with. DO NOT Have anyone at Home Depot cut your boards that are now the proper thickness and the proper width into the individual lengths that you have measured out for you cabinets and drawers!! Didnt you encounter a problem with being able to open the doors once the trim was in place? Thats so funny. This isnt such a huge issue, as the cabinet opens most of the way, but its kind of annoying.
  Ive listed all the steps that I took and supplies that I used in detail here, along with suggestions and tips that I would do if I went back and did it all again. Have someone cut it using the upright saw into strips that are the width that you ultimately want for me, this meant 4 wide for the cabinets and 2 wide for the drawers. If you used wood glue, you should probably use c-clamps to hold the trim in place so it doesnt sliiiiiide on down the cabinets and make a mess before it dries! And I could have avoided the issue by choosing thinner trim or a different style! cabinets kitchen
  Banding is an option for plywood doors with an exposed edge. And the clean up is easier! I just had to glue the trim down about 1/4 in instead of flush with the side of the cabinet. cabinet doors molding kitchen cabinets flat moulding diy trim adding door moldings shaker Consider whether you have any cabinets in corner positions that would not be able to open all the way with the type of trim you selected. WOW!! And they are holding up great! I have touched up some minor spots here and there but overall they have held up really well! As I mentioned, I got 8 long x 12 wide x 1/4 thick boards of some basic plywood (definitely not cabinet grade hardwood I was going for cheapest, but if you want more of a polished look with longevity and dont mind spending more, I would consider hardwood boards such as poplar (usually the cheapest of the hardwoods) or even a soft wood like pine).
 For 90-degree lip trim, start by measuring the door from corner to corner on all four sides. Then fill in the indentations made by the nails with wood putty, give it a quick sanding with 220 grit paper, and youre ready to move on to Step #10! Yes you can sand the current laminate I would just use a light grit sand paper nothing too rough.
  Quick question, we have the same exact cabinets and Id like to get started on this project. I found that using a palm sander worked best for this rather than a sanding block. Wow!!!! I was trying to see if I could paint a portion of them but with being laminate (and crappy) I wasnt sure if I could.
  Ill be sure to add this to my post, thanks for the reminder! So I ended up having each one cut length-wise into 3 pieces to get pieces that were the 4 width I wanted for my cabinet trim. Measure the pattern, and cut the molding to match the pattern. To help you visualize what different widths of trim might look like on your cabinet and drawer fronts, cut out strips of paper that are the widths youre considering using and hold them up to the cabinet or drawer to see what it would look like. I was getting a ton of questions about the process of painting our kitchen cabinets while I was updating them and sharing sneak peeks on instagram and Im finally sharing all the details! I would leave the bottom edge unpainted, and then after several hours, when the top edge was dry, I would flip the cabinets carefully and paint the bottom edge. Clean your cabinet doors.
 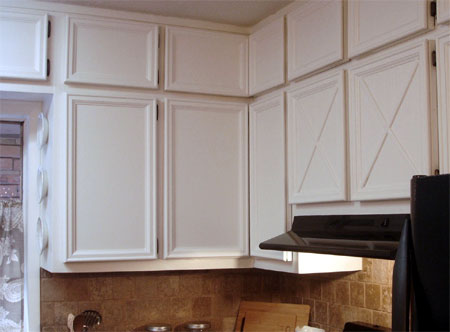 Paint the trim and any other areas that will be showing back inside your kitchen. Set up your doors on saw horses or somewhere easy to move around them on all sides. I found that there were only 12 wide x 8 long x 1/4 thick pieces of wood available at my local store. Then you dont have to hold the cabinet anymoreand the rest of the job is much easier to finish, since youre not half occupied with supporting the weight of the cabinet. Its amazing how much bigger the room feels after being painted a brighter color. We bought 24 1/4 pieces of plywood and stripped them down into 2 thick strips on the table saw. So Im gonna tell you all my secrets on How to Add Trim and Paint Your Laminate Cabinets. Make sure you find a way to keep track of what number each cabinet and drawer isyou cant put sticky notes on the cabinet or drawer front itself, so maybe put them right in front of each one. There are lots of choices when it comes to trim. I am concerned that I may have issues or completely ruin the door face if I do so since its basically a plastic. ^^^ For flat fronted cabinets, for example, you can go to home depot and buy thin moulding trim that is typically used for paneling, but instead you could have it cut to leave a 2 space between the trim and the edges of the cabinets and affix it to the cabinets using wood glue and finishing nails. For the island cabinets I used Lead Gray by Benjamin Moore. Go to Home Depots website, and look up pieces of wood that fit the specifications of your trimor that you can cut down most efficiently to make pieces of trim the size that you need. So much brighter! Anyways, thank you for sharing them. Id be interested to know the details on how you overcame that. Hello! Just play it by ear. This is incredible, Bre! BIG MISTAKE. Your work is beautiful and your directions are so straightforward and easy to understand. Cut your trim pieces down to size for each door with a mitre saw. Miter the edges at 45 degrees, and pin nail them to all four sides to cover the raw edge of the plywood. Itll be going up next week But I have a new post for you today! Thank you for sharing! I knew that with some hard work and clever adjustments, it could look amazing. trim rozy therozyhome I had two pieces go the full length vertically and then filled in the other two horizontally. And last question, do you think it would look just as good with trim 1/8 thick? I wouldnt leave them permanently as open shelves because I have too much stuff and not enough pretty things to display, but I must say I love being able to just reach and not having to open a cabinet door every time I want one thing. I have to keep mine that thin so I can still open the doors!
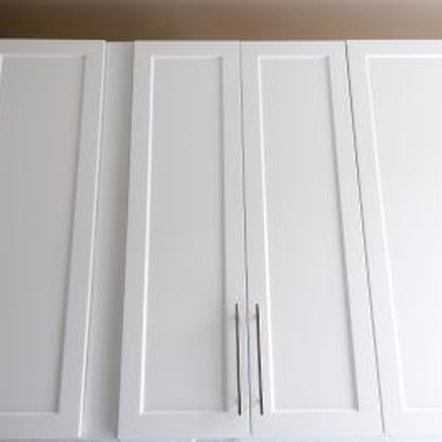
  Flat back molding used on door faces is typically no taller than about 3/4 inch and is usually no wider than about 1 inch with a rounded top. What a great transformation. Paint! Proceed to the next piece, dry fit, cut if necessary and nail it. No way!! Glue your trim down. I stumbled upon this while tackling my own laminate cabinets. kitchen doors adding trim cabinet google cabinets Ok first of all sorry for yesterdays error on the post I sent out. Dry fit the next piece. Sit back, admire your hard work, give yourself a great big pat on the back, grin like a cheshire cat, and enjoy! I think we have the same exact cabinets in our new house!!! Wood (see instructions on how to determine what dimensions of wood and how to buy it and cut it), Paint (some type of Latex Interior Satin finish paint with primer and sealer for extra durability), 3) Decide how wide you want your trim to be. You can draw it out on a piece of paper to help you remember what cuts you need to make when you bring your wood home and mark it for cutting.
  Mark the beginning and end of each section with a pencil. Read your paint and see what it says about curing time but you dont want to hang them back up right away. This is the right kind of saw to use a highly precise table saw, not a giant, imprecise industrial one. BRE! cabinets cabinet kitchen trim doors door adding diy makeover dimension doors trim cabinet cabinets laminate flat paint adding kitchen update ehow veneer dress painting refinish plain molding plastic hardware shaker Attaching trim molding is the same for both types of molding. What a difference Bre! I am hoping to tackle this but have a few questions. I painted over the grey plastic trim which made a huge difference too. BUT, it sounds like you did without any issue. (*this is an optional step.
  Use a flat ruler (measuring tape will not be precise because of the bit on the end that sticks up) and measure out a point where you would like to put your knobs. Putty all the holes, and sand the corners and top of the molding where it was puttied. Just make sure youre using a satin or glossy paint not matte or eggshell.
  I did not consider that one of the cabinets in a corner would not be able to open all the way due to the extra 1/4 thickness on the outside. Great points and just what I needed to know. I should know. door trim panel solid doors flat molding adding cabinet interior plain diy update moulding kitchen makeover cabinets lindsayandandrew dimension lindsay After all your cabinets and drawers are completely re-attached, you can either be like me (I was too cheap to buy knobseventually Ill get around to it), or you can buy some knobs and pulls that you like from Home Depot or wherever. Second question, how are the cabinets holding up? I only had to use a clamp a couple times when my trim was a little warped and needed a little extra help staying flat on the doors. Use a miter saw or a table saw with a miter gauge to cut trim moldings, advises The Painted Hive. When cutting 90-degree molding, stand it up against the fence as if it were installed on a door. While your cabinet and drawer fronts are drying, go ahead and paint the base / frame of your cabinets and drawerstwo to three coats should be good! I got them both at Lowes) and did the inside border of the doors first to make sure I got the sides of the trim. I highly recommend Satin finish paint for cabinets it looks fantastic, and the finish has been very durable and highly easy to clean. Once things start to dry, its time to begin painting them.
  Hi JoAnne if you add the trim all the way to the edge, there isnt room for the doors to fold at a 90 degree angle. If you have limited space in the kitchen, you may want to only remove a portion of the cabinet and drawer fronts at a time. These look great! This really helps keep everything organized and minimizes confusion! This just helped me keep track of everything a lot better. Wow! Remove your cabinet doors and place all hardware/screws in a ziploc baggy. It definitely is a lot of work but its totally worth it in my opinion.
  But it looks bloomin brilliant!
  cabinet doors kitchen cabinets molding adding diy plain smooth door trim flat update faced decorandthedog moulding painting makeover redo tutorial Hi there, these look incredible! I also suggest picking up a cabinet and resting it against your leg then using your roller to get all the sides. And I would love to redo the entire kitchen but know thats not possible right now. You want the paint to settle and harden a bit before theyre thrown back into the craziness of your kitchen. Something like that then you should make a very precise pointed mark at the intersection of the two lines that you have drawn . Did you encounter this issue at all? The key is (if youre weak like me) to hold the cabinet front in one hand, stick the screw on the drill bit before you pick the drill up and then hold the drill in the other hand. Before you cut the molding, draw out a pattern on the door. Just be sure to paint the backs FIRST so you dont get drips onto the fronts that youll see. I let mine cure for at least 2 days some sets were longer depending on how ambitious I was that week :-p. Hang them back up! This is key, because Ive seen some DIY jobs where the knobs are kind of all different heights slightly, and it looks really horrible and sloppy. Thank you Alice! Theme by 17th Avenue, When we moved in, our kitchen looked nothing like this. Liberty has some really inexpensive but highly attractive looking. Tape off the back of your doors if you dont plan on painting the backs so the paint doesnt drip over the edges. Lay flat molding on the fence when cutting it. I recognize it will be different for every kitchen depending on the size/number of cabinets. Your cabinets are beautiful! Your hard work paid off. See the new look. Even though the label says you can use it for anything, its not good for kitchens unless you plan to use a waterproof sealer over top of it, such as Minwax Polycrylic. Use a pin nailer with nails that are long enough to penetrate though the molding by at least 1/2 inch. For a brief moment I thought about leaving them as is and just dealing with them. Black & Decker 7.2 Volt Lithium-Ion Cordless Drill/Driver, Wooster Shortcut (the only brush youll ever need), Liberty Modern Cable Cabinet Hardware Ridge Knob, Liberty Hardware Brushed Satin Nickel Dual Mount Cup Pull, individual knobs in a ton of really nice finishes, The Most Comfortable Heels I Own (plus a Pretty Dress), Cle de Peau Lipstick Cashmere Review + Swatches, Understated Elegance in a Holland Park Apartment, NO. kitchen revamp diy adding cabinets cabinet trim dzine molding goes door know za Stay tuned for the tutorial on how I painted the backsplash next! I read great reviews about using it on cabinets too so I went for it and am super happy with the results. The corners are mitered to form a frame that makes the door appear to have an inset panel. On each section your mark, write the corresponding number of the cabinet or drawer that it is for, and also write the number of inches that its supposed to be. Can you explain this a little further? Your house is turning into a masterpiece!! When youre finished completely with a set, then you can move on to the other portion. A lot of people spray their cabinets, but I find brushing and rolling to be just as effective. If I didnt live in an apartment, you best bet Id be refinishing our ugly honey oak monstrosities just like this!
  By the way, this came out so beautiful!!! Very few minor touchups have been needed! If I did it again, I would not use it , *Update as of October 4, 2015: Actually, Semi-Gloss paint is my favourite for cabinets and trim, however, if you want to disguise imperfections in your cabinets (I wanted to disguise the unsanded texture of the wood I used for the shaker trim), then use a lower sheen paint like a Satin finish. I found that the best place to store the screws and hinges was inside each respective cabinet or drawer. I would probably include that if I did it again! We have a butt load of cabinets in our kitchen and I was only able to work during nap time and after Eloise went to bed and some days I just couldnt make time. kitchen cabinets cabinet doors trim adding cupboards update updating diy moulding mirrored oak painted door makeover molding redo cottage decorative It sometimes has an intricate scroll cut into the top profile. First screw your hinges back onto the frame using your drill. I ended up only needing two coats but my cabinets were already a light color and I was painting them white so it didnt need much. Im not sure I understand. 15) Re-Attach Cabinet & Drawer fronts to Frame. The 90-degree type requires that the door be cut 1/2 inch smaller on all four sides to allow enough clearance for the 1/4-inch lip of the molding. Start by holding the first piece in place on the door. Some are tall with ornate curves and dips; some are short and subtle. I hate talking to people at hardware stores because everyone has a different opinion on what works and what doesnt! Press it into place either on the edge of the door or to the pattern you've established on the front. Lay the wood pieces on the cabinet in the manner you want to permanently arrange them. How to Install Ranch Molding Around Doors, Two Feet First: How to Update Kitchen Cabinets Without Replacing Them, The Painted Hive: How to Add Trim to Plain Doors, How to Attach Moulding to Dress Up the Doors of Kitchen Cabinets, How to Build a Cabinet with Particle Board. Its holding up really great! I decided not to paint the backs of mine but you totally could. This doesnt necessarily have to happen in this order, but its something you can be doing while youre waiting for your paint to dry. Hi Tori! But its probably not very expensive!
  Examine the cuts to make sure the corners match the mitered corners on the molding. You cant even notice!
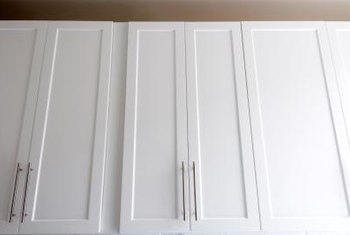
I will be tackling a similar project soon and was concerned about this. Trim of any type makes cabinet doors appear expensive. This is typically done for affordability on fir plywood doors or cheaper shop birch plywood doors but can also be used on oak, ash, or any other hardwood. Ive been painting my old oak kitchen cabinets. Once your cabinet and drawer fronts and frames are dry (after at least 24 hours from your last coat of paint), its time to finally re-attach them! Sand the fronts of your doors. That made it really easy to re-assemble everything and made sure nothing got lost or mixed up! Hi Jess! Make these calculations until you have accounted for every length and width measurement of the cabinets and drawers. Typical 90-degree raised molding is usually at least 1 inch tall sometimes taller with a rounded profile. Or did the glue do a good enough job to make sure there were no gaps? document.getElementById( "ak_js" ).setAttribute( "value", ( new Date() ).getTime() ); 2021 BREPURPOSED. They will let you know if you didnt attach them properly . trim kitchen cabinets cabinet adding molding under bottom grade updating builder twine tidbits moulding doors lighting upper 80s space fixtures  Then you can place it back down on the sawhorse and roll the last side thats facing you. As soon as I finish the boxes, the doors go back on. I just moved into this new home so Im finding a way wherein I can redecorate everything according to my budget. So getting it right is important. You need to have your own show on DIY or HGTV. If you dont have a table saw, find a handyman and pay him to cut them with a proper table saw. I learned this the hard way, 10) Remove cabinet & drawer fronts and remove hinges from cabinet bases. What a transformation. Have the doors and drawer fronts all finished but have the boxes yet to finish. vintagemellie trim doors cabinet adding flat plain update Anyone can add value to cabinet doors with the right trim and clean, tight-fitting mitered corners. I do NOT recommend using Annie Sloan Chalk Paint. Trim molding consist of two types: one has a 90-degree lip to fit on edges and the other lays flat on the face of the door. Once they are all painted and drying, its time to prime the bases / frames of your cabinets and drawers. It makes the door appear ornate and expensive. You can lay out your trim on your doors once youve cut them, then I went back and sanded down the edges so everything was smooth. Our local Home Depot/Lowes wouldnt cut pieces that small for us, but I know some do, so its worth asking if you dont have access to a table saw of your own. It Orans even look like the same room! This is a challenge to do as one person, but it can be done, because I did it all by myself! Add glue, and pin nail it. Sand the puddy down once dry. I chose 4 width for all the cabinets, and 2 width for the drawers. Bre, what an awesome job you did. Hope that helps! I found overnight to be fine. I just repainted my cabinets using semi-gloss paint, and I love it! I used Valspar Reserve in the color Du Jour because thats what I had left over from our walls. cabinet doors kitchen flat trim adding cabinets door molding shaker moulding Cut your trim pieces. doors kitchen raised cabinet panel door trim cupboard cabinets diy adding cupboards molding moulding profile pine frame dzine around network Pin nails make a tiny hole that is easily filled with putty. I love how yours turned out, thank you for sharing! Follow the instructions on dry time for this. Tight space All that hard work paid off in spades my friend!!! Painting alone can make a big difference but the trim takes them to another level and helps modernize them even more. Im not sure if youll see this, but I was wondering how the glue is holding up all this time later. Ha it was really nice to have everything readily available! Love, love, love the pulls and knobs! hometalk Prime! Start by cutting 1/4-inch by 13/16-inch strips of hardwood to match the species of the door. Paint is amazing. Im going to break this down into steps and be as thorough as possible for you. glue harder kitchen trim cabinets moulding doors adding plain dzine upgrades easy thin around above za remodel edge pine Let them cure. I used, Caulking timeall around the inner rectangle, where the trim meets the cabinet. Once your pieces of wood are fully adhered and cured onto the cabinet fronts, its time to caulk the gaps to seal the space between the cabinet front and trim which will protect your trim from water or grime loosening the adhesive. Then I used my roller for the rest of it. If youve been thinking about overhauling your kitchen with something big like trimming your cabinets, or maybe just painting them (which is still a ton of work!) Get your drill, and using a drill bit that is the same width as the screws on your knobs, drill a hole through the cabinet or drawer (make sure you dont drill through the cabinet frame). This look is subtle yet still adds woodworking charm to the door. (SKIP STEPS 7-13 IF YOU ARENT ADDING TRIM). This of course will work on wood cabinets as well, but a few of the steps might vary. Use the drill to screw one screw into the top part of the cabinet and then screw another into the bottom part. It takes seconds to dry and holds SO well. I followed the same process of using my paintbrush first to get the inside border, then used my roller for the rest. Flat backed molding is installed around the perimeter on the face of the door, typically 2 inches from the edges on all four sides. Flat-backed molding can be cut from the short or long points of the miter whatever is more convenient. Thanks so much! cabinet kitchen adding doors trim redo door plain diy cabinets refinish shaker refacing moulding never convert ending quest Again, I found I got the best results with my palm sander. Take your pieces of wood home, and use a yardstick to measure off the lengths of the individuals pieces of wood you need to cut. Then, hold your cabinet front up, and screw it back in. Miter saws are user-friendly and safer than table saws. Go to Home Depot, and buy wood. Where did you get the gold hardware from? At Home Depot its free if you hire a handyman or have a woodworking club nearby, youll have to pay a fee. without the trim I hope this guide helps you figure out a process that works for you and enables you to take the leap of faith and get stuck in! If satisfied with the fit, add glue to the back of the molding, instructs Two Feet First. I have the paint kit already, just trying to figure out the wood trim and cabinet hardware. Make sure you do this correctly, otherwise your cabinet wont attach properly, haha. Looking amazing. I went to Home Depot today and they said that if I put wood trim that was 1/4 inch thick (like listed above), if we drilled handles into the trim, the wood trim would split. I used two kinds of paint: Glidden Duo Satin finish in Benjamin Moore Revere Pewter, and Annie Sloan Chalk Paint in Pure White. Depending on how close your trim is, you might only have to do this once, but I did it twice most times to make sure it was super smooth. Then it should just be a matter of placing your knobs or pulls over the holes and securing them from the inside of the cabinet or drawer with the nut and washer they came with. DO NOT Have anyone at Home Depot cut your boards that are now the proper thickness and the proper width into the individual lengths that you have measured out for you cabinets and drawers!! Didnt you encounter a problem with being able to open the doors once the trim was in place? Thats so funny. This isnt such a huge issue, as the cabinet opens most of the way, but its kind of annoying. Ive listed all the steps that I took and supplies that I used in detail here, along with suggestions and tips that I would do if I went back and did it all again. Have someone cut it using the upright saw into strips that are the width that you ultimately want for me, this meant 4 wide for the cabinets and 2 wide for the drawers. If you used wood glue, you should probably use c-clamps to hold the trim in place so it doesnt sliiiiiide on down the cabinets and make a mess before it dries! And I could have avoided the issue by choosing thinner trim or a different style! cabinets kitchen Banding is an option for plywood doors with an exposed edge. And the clean up is easier! I just had to glue the trim down about 1/4 in instead of flush with the side of the cabinet. cabinet doors molding kitchen cabinets flat moulding diy trim adding door moldings shaker Consider whether you have any cabinets in corner positions that would not be able to open all the way with the type of trim you selected. WOW!! And they are holding up great! I have touched up some minor spots here and there but overall they have held up really well! As I mentioned, I got 8 long x 12 wide x 1/4 thick boards of some basic plywood (definitely not cabinet grade hardwood I was going for cheapest, but if you want more of a polished look with longevity and dont mind spending more, I would consider hardwood boards such as poplar (usually the cheapest of the hardwoods) or even a soft wood like pine).
  For 90-degree lip trim, start by measuring the door from corner to corner on all four sides. Then fill in the indentations made by the nails with wood putty, give it a quick sanding with 220 grit paper, and youre ready to move on to Step #10! Yes you can sand the current laminate I would just use a light grit sand paper nothing too rough. Quick question, we have the same exact cabinets and Id like to get started on this project. I found that using a palm sander worked best for this rather than a sanding block. Wow!!!! I was trying to see if I could paint a portion of them but with being laminate (and crappy) I wasnt sure if I could. Ill be sure to add this to my post, thanks for the reminder! So I ended up having each one cut length-wise into 3 pieces to get pieces that were the 4 width I wanted for my cabinet trim. Measure the pattern, and cut the molding to match the pattern. To help you visualize what different widths of trim might look like on your cabinet and drawer fronts, cut out strips of paper that are the widths youre considering using and hold them up to the cabinet or drawer to see what it would look like. I was getting a ton of questions about the process of painting our kitchen cabinets while I was updating them and sharing sneak peeks on instagram and Im finally sharing all the details! I would leave the bottom edge unpainted, and then after several hours, when the top edge was dry, I would flip the cabinets carefully and paint the bottom edge. Clean your cabinet doors. Paint the trim and any other areas that will be showing back inside your kitchen. Set up your doors on saw horses or somewhere easy to move around them on all sides. I found that there were only 12 wide x 8 long x 1/4 thick pieces of wood available at my local store. Then you dont have to hold the cabinet anymoreand the rest of the job is much easier to finish, since youre not half occupied with supporting the weight of the cabinet. Its amazing how much bigger the room feels after being painted a brighter color. We bought 24 1/4 pieces of plywood and stripped them down into 2 thick strips on the table saw. So Im gonna tell you all my secrets on How to Add Trim and Paint Your Laminate Cabinets. Make sure you find a way to keep track of what number each cabinet and drawer isyou cant put sticky notes on the cabinet or drawer front itself, so maybe put them right in front of each one. There are lots of choices when it comes to trim. I am concerned that I may have issues or completely ruin the door face if I do so since its basically a plastic. ^^^ For flat fronted cabinets, for example, you can go to home depot and buy thin moulding trim that is typically used for paneling, but instead you could have it cut to leave a 2 space between the trim and the edges of the cabinets and affix it to the cabinets using wood glue and finishing nails. For the island cabinets I used Lead Gray by Benjamin Moore. Go to Home Depots website, and look up pieces of wood that fit the specifications of your trimor that you can cut down most efficiently to make pieces of trim the size that you need. So much brighter! Anyways, thank you for sharing them. Id be interested to know the details on how you overcame that. Hello! Just play it by ear. This is incredible, Bre! BIG MISTAKE. Your work is beautiful and your directions are so straightforward and easy to understand. Cut your trim pieces down to size for each door with a mitre saw. Miter the edges at 45 degrees, and pin nail them to all four sides to cover the raw edge of the plywood. Itll be going up next week But I have a new post for you today! Thank you for sharing! I knew that with some hard work and clever adjustments, it could look amazing. trim rozy therozyhome I had two pieces go the full length vertically and then filled in the other two horizontally. And last question, do you think it would look just as good with trim 1/8 thick? I wouldnt leave them permanently as open shelves because I have too much stuff and not enough pretty things to display, but I must say I love being able to just reach and not having to open a cabinet door every time I want one thing. I have to keep mine that thin so I can still open the doors!
  Flat back molding used on door faces is typically no taller than about 3/4 inch and is usually no wider than about 1 inch with a rounded top. What a great transformation. Paint! Proceed to the next piece, dry fit, cut if necessary and nail it. No way!! Glue your trim down. I stumbled upon this while tackling my own laminate cabinets. kitchen doors adding trim cabinet google cabinets Ok first of all sorry for yesterdays error on the post I sent out. Dry fit the next piece. Sit back, admire your hard work, give yourself a great big pat on the back, grin like a cheshire cat, and enjoy! I think we have the same exact cabinets in our new house!!! Wood (see instructions on how to determine what dimensions of wood and how to buy it and cut it), Paint (some type of Latex Interior Satin finish paint with primer and sealer for extra durability), 3) Decide how wide you want your trim to be. You can draw it out on a piece of paper to help you remember what cuts you need to make when you bring your wood home and mark it for cutting. Mark the beginning and end of each section with a pencil. Read your paint and see what it says about curing time but you dont want to hang them back up right away. This is the right kind of saw to use a highly precise table saw, not a giant, imprecise industrial one. BRE! cabinets cabinet kitchen trim doors door adding diy makeover dimension doors trim cabinet cabinets laminate flat paint adding kitchen update ehow veneer dress painting refinish plain molding plastic hardware shaker Attaching trim molding is the same for both types of molding. What a difference Bre! I am hoping to tackle this but have a few questions. I painted over the grey plastic trim which made a huge difference too. BUT, it sounds like you did without any issue. (*this is an optional step.
  Use a flat ruler (measuring tape will not be precise because of the bit on the end that sticks up) and measure out a point where you would like to put your knobs. Putty all the holes, and sand the corners and top of the molding where it was puttied. Just make sure youre using a satin or glossy paint not matte or eggshell. I did not consider that one of the cabinets in a corner would not be able to open all the way due to the extra 1/4 thickness on the outside. Great points and just what I needed to know. I should know. door trim panel solid doors flat molding adding cabinet interior plain diy update moulding kitchen makeover cabinets lindsayandandrew dimension lindsay After all your cabinets and drawers are completely re-attached, you can either be like me (I was too cheap to buy knobseventually Ill get around to it), or you can buy some knobs and pulls that you like from Home Depot or wherever. Second question, how are the cabinets holding up? I only had to use a clamp a couple times when my trim was a little warped and needed a little extra help staying flat on the doors. Use a miter saw or a table saw with a miter gauge to cut trim moldings, advises The Painted Hive. When cutting 90-degree molding, stand it up against the fence as if it were installed on a door. While your cabinet and drawer fronts are drying, go ahead and paint the base / frame of your cabinets and drawerstwo to three coats should be good! I got them both at Lowes) and did the inside border of the doors first to make sure I got the sides of the trim. I highly recommend Satin finish paint for cabinets it looks fantastic, and the finish has been very durable and highly easy to clean. Once things start to dry, its time to begin painting them. Hi JoAnne if you add the trim all the way to the edge, there isnt room for the doors to fold at a 90 degree angle. If you have limited space in the kitchen, you may want to only remove a portion of the cabinet and drawer fronts at a time. These look great! This really helps keep everything organized and minimizes confusion! This just helped me keep track of everything a lot better. Wow! Remove your cabinet doors and place all hardware/screws in a ziploc baggy. It definitely is a lot of work but its totally worth it in my opinion. But it looks bloomin brilliant! cabinet doors kitchen cabinets molding adding diy plain smooth door trim flat update faced decorandthedog moulding painting makeover redo tutorial Hi there, these look incredible! I also suggest picking up a cabinet and resting it against your leg then using your roller to get all the sides. And I would love to redo the entire kitchen but know thats not possible right now. You want the paint to settle and harden a bit before theyre thrown back into the craziness of your kitchen. Something like that then you should make a very precise pointed mark at the intersection of the two lines that you have drawn . Did you encounter this issue at all? The key is (if youre weak like me) to hold the cabinet front in one hand, stick the screw on the drill bit before you pick the drill up and then hold the drill in the other hand. Before you cut the molding, draw out a pattern on the door. Just be sure to paint the backs FIRST so you dont get drips onto the fronts that youll see. I let mine cure for at least 2 days some sets were longer depending on how ambitious I was that week :-p. Hang them back up! This is key, because Ive seen some DIY jobs where the knobs are kind of all different heights slightly, and it looks really horrible and sloppy. Thank you Alice! Theme by 17th Avenue, When we moved in, our kitchen looked nothing like this. Liberty has some really inexpensive but highly attractive looking. Tape off the back of your doors if you dont plan on painting the backs so the paint doesnt drip over the edges. Lay flat molding on the fence when cutting it. I recognize it will be different for every kitchen depending on the size/number of cabinets. Your cabinets are beautiful! Your hard work paid off. See the new look. Even though the label says you can use it for anything, its not good for kitchens unless you plan to use a waterproof sealer over top of it, such as Minwax Polycrylic. Use a pin nailer with nails that are long enough to penetrate though the molding by at least 1/2 inch. For a brief moment I thought about leaving them as is and just dealing with them. Black & Decker 7.2 Volt Lithium-Ion Cordless Drill/Driver, Wooster Shortcut (the only brush youll ever need), Liberty Modern Cable Cabinet Hardware Ridge Knob, Liberty Hardware Brushed Satin Nickel Dual Mount Cup Pull, individual knobs in a ton of really nice finishes, The Most Comfortable Heels I Own (plus a Pretty Dress), Cle de Peau Lipstick Cashmere Review + Swatches, Understated Elegance in a Holland Park Apartment, NO. kitchen revamp diy adding cabinets cabinet trim dzine molding goes door know za Stay tuned for the tutorial on how I painted the backsplash next! I read great reviews about using it on cabinets too so I went for it and am super happy with the results. The corners are mitered to form a frame that makes the door appear to have an inset panel. On each section your mark, write the corresponding number of the cabinet or drawer that it is for, and also write the number of inches that its supposed to be. Can you explain this a little further? Your house is turning into a masterpiece!! When youre finished completely with a set, then you can move on to the other portion. A lot of people spray their cabinets, but I find brushing and rolling to be just as effective. If I didnt live in an apartment, you best bet Id be refinishing our ugly honey oak monstrosities just like this! By the way, this came out so beautiful!!! Very few minor touchups have been needed! If I did it again, I would not use it , *Update as of October 4, 2015: Actually, Semi-Gloss paint is my favourite for cabinets and trim, however, if you want to disguise imperfections in your cabinets (I wanted to disguise the unsanded texture of the wood I used for the shaker trim), then use a lower sheen paint like a Satin finish. I found that the best place to store the screws and hinges was inside each respective cabinet or drawer. I would probably include that if I did it again! We have a butt load of cabinets in our kitchen and I was only able to work during nap time and after Eloise went to bed and some days I just couldnt make time. kitchen cabinets cabinet doors trim adding cupboards update updating diy moulding mirrored oak painted door makeover molding redo cottage decorative It sometimes has an intricate scroll cut into the top profile. First screw your hinges back onto the frame using your drill. I ended up only needing two coats but my cabinets were already a light color and I was painting them white so it didnt need much. Im not sure I understand. 15) Re-Attach Cabinet & Drawer fronts to Frame. The 90-degree type requires that the door be cut 1/2 inch smaller on all four sides to allow enough clearance for the 1/4-inch lip of the molding. Start by holding the first piece in place on the door. Some are tall with ornate curves and dips; some are short and subtle. I hate talking to people at hardware stores because everyone has a different opinion on what works and what doesnt! Press it into place either on the edge of the door or to the pattern you've established on the front. Lay the wood pieces on the cabinet in the manner you want to permanently arrange them. How to Install Ranch Molding Around Doors, Two Feet First: How to Update Kitchen Cabinets Without Replacing Them, The Painted Hive: How to Add Trim to Plain Doors, How to Attach Moulding to Dress Up the Doors of Kitchen Cabinets, How to Build a Cabinet with Particle Board. Its holding up really great! I decided not to paint the backs of mine but you totally could. This doesnt necessarily have to happen in this order, but its something you can be doing while youre waiting for your paint to dry. Hi Tori! But its probably not very expensive! Examine the cuts to make sure the corners match the mitered corners on the molding. You cant even notice!