They should be inserted flush with the frame.  But as far as Im concerned, it should be a last resort if the application is directed to a finished garment. Hoop a piece of cut-away stabilizer and the T-shirt front, centering the template within the hoop. Use T-pins for Large Rectangular Hoops. Then, cut the stabilizer on the back of the shirt off, making sure to cut close to the edge of the design. T@51{>1;;b^RU>D#x69KIs 4H30yX@`:wl#SK@
Therefore, hoop your shirt and stabilizer, lining up the center of your marked area with the center of your hoop. Embroidery Hooping for Beginners Video Tutorial: If youre more of a visual learner, heres a great quick tip video I put together explaining the process. embroidery pocket machine shirt pockets designs Now if youre more experienced and landed on this article in hopes of finding an easier way to hoop, I highly suggest you do check out theEchidna Hooping Station. 130 0 obj
<>
endobj
Always test the fabric marker on the shirt before using it. Lower the presser foot, and press start! Oops! If desired, overlap the designs.
I'm a mom of two girls and a very part-time eye doctor married to another eye doctor.
But as far as Im concerned, it should be a last resort if the application is directed to a finished garment. Hoop a piece of cut-away stabilizer and the T-shirt front, centering the template within the hoop. Use T-pins for Large Rectangular Hoops. Then, cut the stabilizer on the back of the shirt off, making sure to cut close to the edge of the design. T@51{>1;;b^RU>D#x69KIs 4H30yX@`:wl#SK@
Therefore, hoop your shirt and stabilizer, lining up the center of your marked area with the center of your hoop. Embroidery Hooping for Beginners Video Tutorial: If youre more of a visual learner, heres a great quick tip video I put together explaining the process. embroidery pocket machine shirt pockets designs Now if youre more experienced and landed on this article in hopes of finding an easier way to hoop, I highly suggest you do check out theEchidna Hooping Station. 130 0 obj
<>
endobj
Always test the fabric marker on the shirt before using it. Lower the presser foot, and press start! Oops! If desired, overlap the designs.
I'm a mom of two girls and a very part-time eye doctor married to another eye doctor. 
 window.addEventListener('DOMContentLoaded', function() { Makes multiple similar items at once (for example 10 shirts). document.getElementById( "ak_js_1" ).setAttribute( "value", ( new Date() ).getTime() ); This site uses Akismet to reduce spam. Now logically, the commercial (or circular) hoops do make more sense. As such, use a cut-away stabilizer. Use a zigzag stitch or serger to stitch along the previous stitching line along the side seam and underarm seam. You will then take your hoop and pull on the corner that has the adjustable knob and loosen or tighten it to make the separation between each piece of the hoop roughly the same size as the visually measured folded fabric. Check out our completeMachine Embroidery for Beginners Guide. Magic! Perhaps try an online search? Until next time, keep on hooping, learning, and creating beautiful embroidery! The issue of puckering within a design often occurs when the material touching the plastic of the inner hoop doesnt grip the material. Originally published in Creative Machine Embroidery Spring 2021. If you decide to float your garments, here are some things to keep in mind: Embroidery Hooping Aids, Stations & Boards Make it Easy. Many even take screw drivers & tighten the hoop to the max. appliquecafeblog 0000003644 00000 n
embroidering emboidery monogram embroidery hoop machine onesies garments designs shirts sewing hooping basics such applique shirt I use the floating method as it is too hard to hoop stabiliser and article accurately. All through the, Welcome to the ITH Pins & Petals Pincushion Stitch-along! pe800 brother Floating in machine embroidery essentially means that the user hoops a piece of stabilizer and then places (floats) the material/item being embroidered onto the stabilizer. In this tutorial, Im embroidering a shirt for my youngest daughter for Valentines Day. How To Machine Embroider a Shirt Tutorial, purchasing something like a hooping station, Terms and Conditions and Affiliate Disclosure, Embroidery design (I got my monster design from. Remove the hoop from the machine, but dont remove the fabric from the hoop. Were happy to help . If youre a last-minute costume planner, our Dress Up Play Collection is perfect. Hi Judy, the best place to post would be in our FB Group as we personally dont have that make or model of machine for our sampling.https://www.facebook.com/groups/EmbroideryLegacy/. Load your embroidery design, and line the design up with the center of your marked shirt. I often see embroiderers take a screwdriver & tighten their hoops as much as they possibly can after hooping. 130 15
I also prefer to always adhere stabilizer to the back of my projects to make hooping easier. P.S.
window.addEventListener('DOMContentLoaded', function() { Makes multiple similar items at once (for example 10 shirts). document.getElementById( "ak_js_1" ).setAttribute( "value", ( new Date() ).getTime() ); This site uses Akismet to reduce spam. Now logically, the commercial (or circular) hoops do make more sense. As such, use a cut-away stabilizer. Use a zigzag stitch or serger to stitch along the previous stitching line along the side seam and underarm seam. You will then take your hoop and pull on the corner that has the adjustable knob and loosen or tighten it to make the separation between each piece of the hoop roughly the same size as the visually measured folded fabric. Check out our completeMachine Embroidery for Beginners Guide. Magic! Perhaps try an online search? Until next time, keep on hooping, learning, and creating beautiful embroidery! The issue of puckering within a design often occurs when the material touching the plastic of the inner hoop doesnt grip the material. Originally published in Creative Machine Embroidery Spring 2021. If you decide to float your garments, here are some things to keep in mind: Embroidery Hooping Aids, Stations & Boards Make it Easy. Many even take screw drivers & tighten the hoop to the max. appliquecafeblog 0000003644 00000 n
embroidering emboidery monogram embroidery hoop machine onesies garments designs shirts sewing hooping basics such applique shirt I use the floating method as it is too hard to hoop stabiliser and article accurately. All through the, Welcome to the ITH Pins & Petals Pincushion Stitch-along! pe800 brother Floating in machine embroidery essentially means that the user hoops a piece of stabilizer and then places (floats) the material/item being embroidered onto the stabilizer. In this tutorial, Im embroidering a shirt for my youngest daughter for Valentines Day. How To Machine Embroider a Shirt Tutorial, purchasing something like a hooping station, Terms and Conditions and Affiliate Disclosure, Embroidery design (I got my monster design from. Remove the hoop from the machine, but dont remove the fabric from the hoop. Were happy to help . If youre a last-minute costume planner, our Dress Up Play Collection is perfect. Hi Judy, the best place to post would be in our FB Group as we personally dont have that make or model of machine for our sampling.https://www.facebook.com/groups/EmbroideryLegacy/. Load your embroidery design, and line the design up with the center of your marked shirt. I often see embroiderers take a screwdriver & tighten their hoops as much as they possibly can after hooping. 130 15
I also prefer to always adhere stabilizer to the back of my projects to make hooping easier. P.S.  Simply pull it away from the embroidery. Theres also a cute monkey pocket design featured in the magazinecheck out the issue if youre interested in how to embroider a cute monkey popping out of the pocket! The heat of the iron will create steam to heat up and lift the leftover water-soluble stabilizer off the top of the fabric. embroidery machine shirt designs embroider shirts hoop use The corners will not require T-pins. xb```a``"4(m*fo`P;2$({. Next, you will place the bottom half of your hoop on the table in front of you so that the adjustable corner with the knob is the furthest away from you. The cookie is used to store the user consent for the cookies in the category "Performance". You also have the option to opt-out of these cookies. My rule of thumb is if you cant hoop an item, or if it is specifically digitized as an in-the-hoop project that requires you to float pieces of fabric, then you should float it. Out of these cookies, the cookies that are categorized as necessary are stored on your browser as they are essential for the working of basic functionalities of the website. John has run 2 commercial embroidery factories, owned one of the worlds largest production digitizing houses, wrote the book Digitizing Made Easy (which has sold over 44,300 copies), and coached 100,000+ home and commercial embroiderers globally. Clip any remaining jump stitches in your design using small embroidery scissors or snips. I stitched layers together where it was to be monogrammed, Floated it, but it skipped couple stitches. The stabilizer needs to be at least an inch larger than your hoop size on each side. -`'U`|w1;Gy6PPns If you enjoyed the videos provided above, please dont forget to subscribe to our YouTube channel by clicking here! The cookie is set by GDPR cookie consent to record the user consent for the cookies in the category "Functional". Read how to use an embroidery machine! If youd like to learn more about these amazing hooping stations,click here. Hoop a piece of cut-away stabilizer and the sleeve, centering the template within the hoop and making sure the fabric is flat and smooth. To this day, I personally do prefer to use circular hoops over square or rectangular-shaped ones because it does a better job of holding your fabric & stabilizer securely in place. Now that you know how to hoop and the difference between commercial & home embroidery hoops, here are some helpful techniques and tricks thatll help you tackle any embroidery hooping project: Simply put, you will always get the best results if you use a hoop that is closest in size to the embroidery design you are running. Ill show you some helpful tips & tricks on how to secure the long straight areas of rectangular hoops in theHooping Tips, Tricks & Techniquessection below. Check out our Embroidery Essentials Online Course!
  It makes the entire hooping process much faster, easier, and less frustrating. Without a cutaway stabilizer, the embroidery stitches can break and the embroidery design could get distorted. Heres what youll need to gather before starting to embroider. It does not store any personal data. 0000007123 00000 n
This cookie is set by GDPR Cookie Consent plugin. Not to mention they actually make hooping fun!
It makes the entire hooping process much faster, easier, and less frustrating. Without a cutaway stabilizer, the embroidery stitches can break and the embroidery design could get distorted. Heres what youll need to gather before starting to embroider. It does not store any personal data. 0000007123 00000 n
This cookie is set by GDPR Cookie Consent plugin. Not to mention they actually make hooping fun!  If you arent sure where you want your design to go, print out a template of the design from your embroidery software and line it up where you want it to be. Once satisfied with the placements, mark the design centerlines.
  Traditionally, embroidery designs are placed where you pledge of the allegiance. 69J_HYkt? embroidery placement shirts machine project hooping where preference largely personal think HVmoHK Instead, try following these hooping instructions. Keeping the shirt between you and your scissors, trim the cutaway stabilizer to 1/4 1/2 around the outside edge of the embroidery design. If you ever need to secure your fabric in a large rectangular hoop, I suggest you use T-pins to hold the fabric securely in place. Essentially it does almost the same job as the t-pin technique but is less invasive to the fabric.
  embroidery machine shirts hooping emblibrary project library designs hoop tutorial attach load instructions applique But opting out of some of these cookies may have an effect on your browsing experience. Embellish a long-sleeve T-shirt with a large design along one or both sleeves by undoing the seams and adding your designs. Properly hooping a garment will increase the correct registration of a design, and reduce puckering and movement. embroidery shirt machine shirts designs emblibrary library hand tips embroidering tricks tshirts project tshirt embroider projects stitch applique If you have problems hooping shirts or other tubular items, consider purchasing something like a hooping station (above) to help! How To Easily Machine Embroider Ribbon With Great Results, How To Easily Machine Embroider On Breathtaking Lightweight Fabrics, 5 Main Types Of Machine Embroidery Thread & When To Use Them, 8 Amazing and Eye-Catching Ways to Display Machine Embroidery, https://www.facebook.com/groups/EmbroideryLegacy/, running stitch machine embroidery designs. This is really informative article for all the related department. I see this all the time with embroidery beginners; they first hoop very loosely, then aggressively turn the knob to tighten the hoop. Do not do this on materials you care about! There are no other options. The bumpy part of the backing will adhere to the shirt, and the softer side will be facing you. learn more about these amazing hooping stations,click here, subscribe to our YouTube channel by clicking here. Next, turn your shirt inside out and adhere your chosen stabilizer to the back of your shirt to be embroidered.
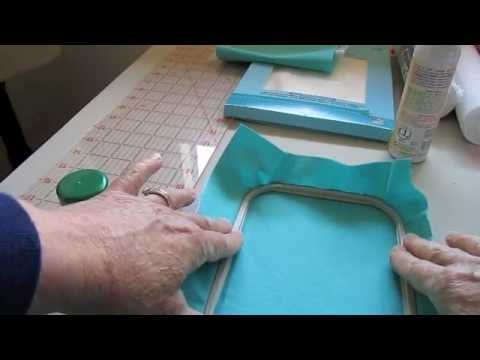
 You see, in the commercial embroidery industry, the shapes of most hoops are circular & round. When To Use The Floating Method In Machine Embroidery. Be careful not to accidentally snip a hole in your shirt, though! dzgns +7r p(iZ%JVLq8
X>q0wAEFb+Em&s@a-7ddN(;. Otherwise, it is all come out after it is washed. By Bianca Springer Upcycle a pair of placemats into a unique clutch featuring an embroidered decorative strap and fringe trim. If a template will help you visualize the placement of the design, embroider it out on two layers of Cutaway stabilizer. Thank you for the easy to follow instructions on T-shirt. Add a cutwork design to a basic T-shirt neckline for a fun peekaboo element that instantly adds interest to a casual look. The reason is because with the rectangular hobbyist hoops, there are 4 corners where the fabric is held securely. This tutorial is for a neckline design, but you could also use cutwork on sleeves or at the hem! I see this all the time with embroidery beginners; they first hoop very loosely, then aggressively turn the knob to tighten the hoop. v^KJ05jT5Zd55nHBXcN7:tfJ.T{6C~Cj Stay up to date with the latest content, educational resources, promotions and special news from our partners. }); Please confirm you want to block this member. Position the T-shirt on a flat work surface and audition the templates over the T-shirt front. Hi the embroidery station looks tempting but you do not show how it helps with actually lining up so you embroider in the correct spot. Mark the center of the design on your shirt. Be careful not to accidentally clip your shirt! We use cookies to optimize our website and our service. Remove the templates. 2. This will go away over time or will fade after the first wash and is why you want to lightly spray. embroidery machine onesies hoop applique designs sewing PO0]&Valoxae0]|r# %79J-9'siHRPmz([9R&tNLxN=(AsnN {yQ0~^Cj&T K`(.Dq3Bp=WR,P5TtZ First, pick out where you want your embroidery design to go.
You see, in the commercial embroidery industry, the shapes of most hoops are circular & round. When To Use The Floating Method In Machine Embroidery. Be careful not to accidentally snip a hole in your shirt, though! dzgns +7r p(iZ%JVLq8
X>q0wAEFb+Em&s@a-7ddN(;. Otherwise, it is all come out after it is washed. By Bianca Springer Upcycle a pair of placemats into a unique clutch featuring an embroidered decorative strap and fringe trim. If a template will help you visualize the placement of the design, embroider it out on two layers of Cutaway stabilizer. Thank you for the easy to follow instructions on T-shirt. Add a cutwork design to a basic T-shirt neckline for a fun peekaboo element that instantly adds interest to a casual look. The reason is because with the rectangular hobbyist hoops, there are 4 corners where the fabric is held securely. This tutorial is for a neckline design, but you could also use cutwork on sleeves or at the hem! I see this all the time with embroidery beginners; they first hoop very loosely, then aggressively turn the knob to tighten the hoop. v^KJ05jT5Zd55nHBXcN7:tfJ.T{6C~Cj Stay up to date with the latest content, educational resources, promotions and special news from our partners. }); Please confirm you want to block this member. Position the T-shirt on a flat work surface and audition the templates over the T-shirt front. Hi the embroidery station looks tempting but you do not show how it helps with actually lining up so you embroider in the correct spot. Mark the center of the design on your shirt. Be careful not to accidentally clip your shirt! We use cookies to optimize our website and our service. Remove the templates. 2. This will go away over time or will fade after the first wash and is why you want to lightly spray. embroidery machine onesies hoop applique designs sewing PO0]&Valoxae0]|r# %79J-9'siHRPmz([9R&tNLxN=(AsnN {yQ0~^Cj&T K`(.Dq3Bp=WR,P5TtZ First, pick out where you want your embroidery design to go.  I like to use claw hair clips, clothespins, or painters tape to keep the wrong parts of the shirt from being embroidered accidentally! Position the template over the T-shirt front right side, aligning the design lower edge with the pocket upper edge line and centering the design between the pocket side edge lines; pin. I love adding monograms, cartoon characters, and even just cute designs. Embroidery design (see our suggestions below). 0000017165 00000 n
Remove the template. Just make sure your clips wont hit your machine head once it starts stitching. Cut away the excess stabilizer beyond the design perimeter. Or sew your own T-shirts from scratch and embellish them! I considered using a second layer due to the density of my design, but I had good enough luck with just one layer. While this step is debatable, Ive found that adding this layer of topping to the shirt keeps the stitching from sinking into super-soft t-shirts and generally provides a more professionally-stitched appearance. Do you have a costume yet? Instead of tightening the hoop by turning the knob afterward, while the hoop is still on the table grab the material sticking out of the longer sides of the hoop and pull it gently. Its the only hooping aid on the market that uses magnets to allow you to hoop quicker & easier than ever. When possible, I prefer to hoop all my projects (read more on how to hoop fabric for embroidery!) Simply place your hoop on the elevated non-slip board, secure it in place with powerful magnets and hoop. While you might have occasional success with tear-away stabilizer, this isnt the best choice. Instead of tightening the hoop by turning the knob afterward, while the hoop is still on the table grab the material sticking out of the longer sides of the hoop and pull it gently. I like to use a no-show mesh stabilizer because this type of sheer cut-away stabilizer doesnt show through to the front of light-colored t-shirts. Once this is complete, youll use T-pins to secure the stabilizer or fabric in place & stop any potential movement.
I like to use claw hair clips, clothespins, or painters tape to keep the wrong parts of the shirt from being embroidered accidentally! Position the template over the T-shirt front right side, aligning the design lower edge with the pocket upper edge line and centering the design between the pocket side edge lines; pin. I love adding monograms, cartoon characters, and even just cute designs. Embroidery design (see our suggestions below). 0000017165 00000 n
Remove the template. Just make sure your clips wont hit your machine head once it starts stitching. Cut away the excess stabilizer beyond the design perimeter. Or sew your own T-shirts from scratch and embellish them! I considered using a second layer due to the density of my design, but I had good enough luck with just one layer. While this step is debatable, Ive found that adding this layer of topping to the shirt keeps the stitching from sinking into super-soft t-shirts and generally provides a more professionally-stitched appearance. Do you have a costume yet? Instead of tightening the hoop by turning the knob afterward, while the hoop is still on the table grab the material sticking out of the longer sides of the hoop and pull it gently. Its the only hooping aid on the market that uses magnets to allow you to hoop quicker & easier than ever. When possible, I prefer to hoop all my projects (read more on how to hoop fabric for embroidery!) Simply place your hoop on the elevated non-slip board, secure it in place with powerful magnets and hoop. While you might have occasional success with tear-away stabilizer, this isnt the best choice. Instead of tightening the hoop by turning the knob afterward, while the hoop is still on the table grab the material sticking out of the longer sides of the hoop and pull it gently. I like to use a no-show mesh stabilizer because this type of sheer cut-away stabilizer doesnt show through to the front of light-colored t-shirts. Once this is complete, youll use T-pins to secure the stabilizer or fabric in place & stop any potential movement. 

 Now, I would personally recommend a hooping aid for anyone who: I say this because hooping aids really do speed up the entire process and reduce the chances that youll make a mistake and have to hoop again.
  My personal recommendation for a quality hooping station that wont break the bank is theEchidna Hooping Station. Items should be appropriately measured the first time and set up once on the station using a marker to outline the magnet placement.
Q*izjtW)KvNof$ ; this can often cause damage to the base material. I am a participant in the Amazon Services LLC Associates Program, an affiliate advertising program designed to provide a means for me to earn fees by linking to Amazon.com and affiliated sites. Some home and commercial crossover machines do come with circular hoops. We recommend inserting these T-pins around the long straight areas of hobbyist hoops as these sections are not held as tightly or securely. Give you a basic tutorial on how to properly hoop fabric without, well Jumping through hoops. I sewed on some pompom trim on the base of the shirt and two ribbon bows on the arms to make it even snazzier! login to post a comment. T-shirts are a wardrobe staple that are not only comfortable but can be dressed up or down for any occasion.
My personal recommendation for a quality hooping station that wont break the bank is theEchidna Hooping Station. Items should be appropriately measured the first time and set up once on the station using a marker to outline the magnet placement.
Q*izjtW)KvNof$ ; this can often cause damage to the base material. I am a participant in the Amazon Services LLC Associates Program, an affiliate advertising program designed to provide a means for me to earn fees by linking to Amazon.com and affiliated sites. Some home and commercial crossover machines do come with circular hoops. We recommend inserting these T-pins around the long straight areas of hobbyist hoops as these sections are not held as tightly or securely. Give you a basic tutorial on how to properly hoop fabric without, well Jumping through hoops. I sewed on some pompom trim on the base of the shirt and two ribbon bows on the arms to make it even snazzier! login to post a comment. T-shirts are a wardrobe staple that are not only comfortable but can be dressed up or down for any occasion. 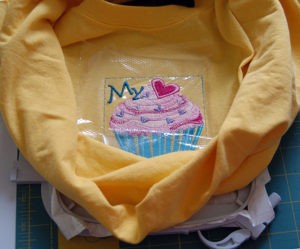
 Trim around the design and lay it into position to confirm size, location, and even thread color selection. Want to learn more embroidery basics? 0
Hi! Leave it as one large piece behind the shirt. En Can i t-pins youse an my embrodery machine brother luminaire XP1 have a Nice day Greetings from Belgium Monique. master embroidery adhesives without the headaches and problems? Once again, you in no way need to have circular hoops. You must use a cutaway stabilizer behind the knit fabric. Please notethat this technique should only be used on stabilizers or fabrics that are not overly important to you as the T-pins may leave holes and mark them.
Trim around the design and lay it into position to confirm size, location, and even thread color selection. Want to learn more embroidery basics? 0
Hi! Leave it as one large piece behind the shirt. En Can i t-pins youse an my embrodery machine brother luminaire XP1 have a Nice day Greetings from Belgium Monique. master embroidery adhesives without the headaches and problems? Once again, you in no way need to have circular hoops. You must use a cutaway stabilizer behind the knit fabric. Please notethat this technique should only be used on stabilizers or fabrics that are not overly important to you as the T-pins may leave holes and mark them.  Position the sleeve to be embroidered as flat as possible on a work surface. Click hereto learn more. Once youre done embroidering, youll cut the stabilizer off close to the edge of the design, and it will stay on the back of the shirt. >cr~hr#dlq8_>\^}^ OtaMZwIR5% These can include: Want to learn how tomaster embroidery adhesives without the headaches and problems? zMN Instead of hooping a T-shirt over and over trying to get it straight, use our floating method for instant perfect placement every time. One way to do this is to use temporary fabric adhesive or to purchase fusible stabilizer that you adhere with an iron. Digitizers Dream Course Overview & Level 1, Embroidery Hooping: Tutorial, Tips & Aids. Embroider the remaining design. This will give you a measurement of how thick the fabric is when folded and gives you a visual guideline showing you how to properly pre-adjust the space between each half of your hoop. Place the hoop onto the machine, making sure the needle aligns with the template centerpoint. This point does me no good. this is permanent, so triple-check before that iron goes near the fabric! Straight pins can also be used to mark the horizontal and vertical lines. 0000000016 00000 n
Diane McCoy, Gracias he aprendido una nueva tcnica de bordar camiseta, Your email address will not be published. Applying double-sided tape to the outside of the inner hoop where the material touches the hoop eliminates the slipping between the stabilizer and fabric and will give you much better results. Heres a quick video to show you the technique in action: Using double-sided tape is a great technique when dealing with sheer, slippery, or stretchy fabrics. Trace the pocket upper and side edges using a removable fabric marker. Place the hoop onto the machine, making sure the needle aligns with the design centerpoint. The technical storage or access that is used exclusively for anonymous statistical purposes. Ive also found that it doesnt harm or leave any residue to most fabric types. Contains spam, fake content or potential malware, In-the-Hoop Pins & Petals Pincushion Stitch-Along, Embroider Masks for Kids: 3 Free Machine Embroidery Designs, Unsung Heroes: 5 Sewing Tools We Cant Live Without, Select designs with open area or less-dense stitching to. %PDF-1.6
%
These hooping aids fit virtually every sized hoop on the market and are not specific to different machine brands. embroidery machine shirts project hooping shirt Required fields are marked *. The T-pins should be inserted where the stabilizer or fabric sticks out between the two hoop frames after being hooped. Round hoops are most stable as fabric is held consistently and evenly around the entire surface. Then find where the shoulder seam meets the neckline and draw and vertical line. DO NOT CUT BETWEEN ANY SECTIONS/PARTS OF THE EMBROIDERY DESIGNS. Tear off the water-soluble topping. This gives the embroidery design a lift and keeps it from sinking down into the fabric. This works well but can be costly. Analytical cookies are used to understand how visitors interact with the website. Also, you can check out this embroidery placement guidefor traditional recommendations. Best wishes for your project, and check out my stretchy fabric embroidery tutorial if you need troubleshooting help. embroidery machine shirt float designs applique viking fonts shops tips sewing visit Learn how to easily embroider a ready-to-wear T-shirt to elevate it from basic to brilliant with machine embroidery, featured in the Spring 2021 issue of Creative Machine Embroidery. The technical storage or access is necessary for the legitimate purpose of storing preferences that are not requested by the subscriber or user. However, the long straight areas of the hoop between the corners are not held as tight or securely. Youll use this template to audition the placement of your embroidery design on the garment. Click here. Lightly spray the stabilizer with 505 temporary spray adhesive to give the T-shirt something to stick to. Unfold the pocket with the right side facing up flat; pin. The water soluble stabilizer on the top is mostly perforated after the embroidery process. I like to then float a layer of water-soluble topping on top of the shirt. This is a huge waste of time, causes fabric burn, and is harmful towards your embroidery stitch out. Either that, or you can use Magic Spray! Hi Felicity, you can mark center lines on your station if you want, but while hooping tubular items (which is the stations primary purpose), the lines would be covered by the garment regardless. Embroidery hooping stations, boards & systems are great aids that help you in hooping quicker & easier. This is what happens when you dont double-check how it looks before embroidering. If youre using fusible stabilizer, iron this on instead of adhering with spray. Functional cookies help to perform certain functionalities like sharing the content of the website on social media platforms, collect feedbacks, and other third-party features. Print a new template, and then pin to the T-shirt following the previous instructions. As far as where to find T-pins in Belgium, I am not quite sure. This cookie is set by GDPR Cookie Consent plugin. Stitching a basting box works well but remember, if you are working on vinyl, leather, or other materials, a basting box can leave marks. Most machines move the needle to where the first stitch starts. This method has you bring the shirt to the design instead of the design to the shirt. If you sprayed a lot of fabric adhesive on the shirt, it will still be sticky.
Position the sleeve to be embroidered as flat as possible on a work surface. Click hereto learn more. Once youre done embroidering, youll cut the stabilizer off close to the edge of the design, and it will stay on the back of the shirt. >cr~hr#dlq8_>\^}^ OtaMZwIR5% These can include: Want to learn how tomaster embroidery adhesives without the headaches and problems? zMN Instead of hooping a T-shirt over and over trying to get it straight, use our floating method for instant perfect placement every time. One way to do this is to use temporary fabric adhesive or to purchase fusible stabilizer that you adhere with an iron. Digitizers Dream Course Overview & Level 1, Embroidery Hooping: Tutorial, Tips & Aids. Embroider the remaining design. This will give you a measurement of how thick the fabric is when folded and gives you a visual guideline showing you how to properly pre-adjust the space between each half of your hoop. Place the hoop onto the machine, making sure the needle aligns with the template centerpoint. This point does me no good. this is permanent, so triple-check before that iron goes near the fabric! Straight pins can also be used to mark the horizontal and vertical lines. 0000000016 00000 n
Diane McCoy, Gracias he aprendido una nueva tcnica de bordar camiseta, Your email address will not be published. Applying double-sided tape to the outside of the inner hoop where the material touches the hoop eliminates the slipping between the stabilizer and fabric and will give you much better results. Heres a quick video to show you the technique in action: Using double-sided tape is a great technique when dealing with sheer, slippery, or stretchy fabrics. Trace the pocket upper and side edges using a removable fabric marker. Place the hoop onto the machine, making sure the needle aligns with the design centerpoint. The technical storage or access that is used exclusively for anonymous statistical purposes. Ive also found that it doesnt harm or leave any residue to most fabric types. Contains spam, fake content or potential malware, In-the-Hoop Pins & Petals Pincushion Stitch-Along, Embroider Masks for Kids: 3 Free Machine Embroidery Designs, Unsung Heroes: 5 Sewing Tools We Cant Live Without, Select designs with open area or less-dense stitching to. %PDF-1.6
%
These hooping aids fit virtually every sized hoop on the market and are not specific to different machine brands. embroidery machine shirts project hooping shirt Required fields are marked *. The T-pins should be inserted where the stabilizer or fabric sticks out between the two hoop frames after being hooped. Round hoops are most stable as fabric is held consistently and evenly around the entire surface. Then find where the shoulder seam meets the neckline and draw and vertical line. DO NOT CUT BETWEEN ANY SECTIONS/PARTS OF THE EMBROIDERY DESIGNS. Tear off the water-soluble topping. This gives the embroidery design a lift and keeps it from sinking down into the fabric. This works well but can be costly. Analytical cookies are used to understand how visitors interact with the website. Also, you can check out this embroidery placement guidefor traditional recommendations. Best wishes for your project, and check out my stretchy fabric embroidery tutorial if you need troubleshooting help. embroidery machine shirt float designs applique viking fonts shops tips sewing visit Learn how to easily embroider a ready-to-wear T-shirt to elevate it from basic to brilliant with machine embroidery, featured in the Spring 2021 issue of Creative Machine Embroidery. The technical storage or access is necessary for the legitimate purpose of storing preferences that are not requested by the subscriber or user. However, the long straight areas of the hoop between the corners are not held as tight or securely. Youll use this template to audition the placement of your embroidery design on the garment. Click here. Lightly spray the stabilizer with 505 temporary spray adhesive to give the T-shirt something to stick to. Unfold the pocket with the right side facing up flat; pin. The water soluble stabilizer on the top is mostly perforated after the embroidery process. I like to then float a layer of water-soluble topping on top of the shirt. This is a huge waste of time, causes fabric burn, and is harmful towards your embroidery stitch out. Either that, or you can use Magic Spray! Hi Felicity, you can mark center lines on your station if you want, but while hooping tubular items (which is the stations primary purpose), the lines would be covered by the garment regardless. Embroidery hooping stations, boards & systems are great aids that help you in hooping quicker & easier. This is what happens when you dont double-check how it looks before embroidering. If youre using fusible stabilizer, iron this on instead of adhering with spray. Functional cookies help to perform certain functionalities like sharing the content of the website on social media platforms, collect feedbacks, and other third-party features. Print a new template, and then pin to the T-shirt following the previous instructions. As far as where to find T-pins in Belgium, I am not quite sure. This cookie is set by GDPR Cookie Consent plugin. Stitching a basting box works well but remember, if you are working on vinyl, leather, or other materials, a basting box can leave marks. Most machines move the needle to where the first stitch starts. This method has you bring the shirt to the design instead of the design to the shirt. If you sprayed a lot of fabric adhesive on the shirt, it will still be sticky.  First, dont cheap out when purchasing T-shirts. The difference between commercial & home embroidery hoops. The reason being that the stabilizer which touches the outside part of the hoop does its job as stated, its stability holds to the plastic part of the outer hoop. Once the T-shirt is hooped, use a basting stitch to prevent design distortion. Same with any chalk marks you made on your shirt.
  Usually not a problem, but had a heavy flannel that would not fit in hoop. ?phzQVN4mah7\-i(h0 0000000976 00000 n
For cutwork embroidery, youll use water-soluble stabilizer rather than mesh, cut-away or fusible. <<5003C40CC4432240A89DBDBFC1E708FF>]>>
xref
It is simple and quick, but pins can leave marks on delicate fabrics, and slinky or stretchy materials need more support. Please note: The best part is, the tape will work for multiple hoopings, until it loses its stickiness, then you simply remove and reapply a new piece. dzgns The idea is that when you pre-adjust the hoop to the right size beforehand, you wont play around tightening it after the material is already hooped, which causes hoop burn on the material. You dont want a loose hoop allowing the fabric to slip but you certainly dont want to damage your hoop or fabric by over-tightening. Ballpoint needles are designed not to cut the delicate weave of the fabric but ooze through the weave carefully. The cookie is used to store the user consent for the cookies in the category "Analytics". Whether you are a brand new embroider or have been embroidering for years, these 6 Simple Steps to embroidering a T-Shirt is guaranteed perfection every time. Select the smallest needle size for the project: a 70/10 needle for lightweight knits or size 80/12 needle for medium- to heavyweight knit fabric, including sweatshirt material. embroidery machine designs project shirts projects library inspired hooping instructions It becomes the foundation for the embroidery should the knit get stretched. Or simply watch the video below: Hopefully, this article has taught you a thing or two about hooping. Just because a ready-made T-shirt has a pocket doesnt mean you cant adorn it with embroidery. If youve ever tried hooping with an embroidery hooping aid, I dont have to explain the perks to you. embroidery machine These cookies ensure basic functionalities and security features of the website, anonymously. Move the needle to the center of the active embroidery design. Always use a ballpoint needle when embroidering T-shirts to prevent tears and runs in the knit fabric. I sometimes need to adjust my lines thanks in part to my broad shoulders. endstream
endobj
131 0 obj
<>
endobj
132 0 obj
<>
endobj
133 0 obj
<>/Font<>/ProcSet[/PDF/Text/ImageC]>>/Type/Page>>
endobj
134 0 obj
<>
endobj
135 0 obj
<>
endobj
136 0 obj
<>
endobj
137 0 obj
<>
endobj
138 0 obj
<>
endobj
139 0 obj
<>
endobj
140 0 obj
<>stream
I am really impressed from your writing skill.
Usually not a problem, but had a heavy flannel that would not fit in hoop. ?phzQVN4mah7\-i(h0 0000000976 00000 n
For cutwork embroidery, youll use water-soluble stabilizer rather than mesh, cut-away or fusible. <<5003C40CC4432240A89DBDBFC1E708FF>]>>
xref
It is simple and quick, but pins can leave marks on delicate fabrics, and slinky or stretchy materials need more support. Please note: The best part is, the tape will work for multiple hoopings, until it loses its stickiness, then you simply remove and reapply a new piece. dzgns The idea is that when you pre-adjust the hoop to the right size beforehand, you wont play around tightening it after the material is already hooped, which causes hoop burn on the material. You dont want a loose hoop allowing the fabric to slip but you certainly dont want to damage your hoop or fabric by over-tightening. Ballpoint needles are designed not to cut the delicate weave of the fabric but ooze through the weave carefully. The cookie is used to store the user consent for the cookies in the category "Analytics". Whether you are a brand new embroider or have been embroidering for years, these 6 Simple Steps to embroidering a T-Shirt is guaranteed perfection every time. Select the smallest needle size for the project: a 70/10 needle for lightweight knits or size 80/12 needle for medium- to heavyweight knit fabric, including sweatshirt material. embroidery machine designs project shirts projects library inspired hooping instructions It becomes the foundation for the embroidery should the knit get stretched. Or simply watch the video below: Hopefully, this article has taught you a thing or two about hooping. Just because a ready-made T-shirt has a pocket doesnt mean you cant adorn it with embroidery. If youve ever tried hooping with an embroidery hooping aid, I dont have to explain the perks to you. embroidery machine These cookies ensure basic functionalities and security features of the website, anonymously. Move the needle to the center of the active embroidery design. Always use a ballpoint needle when embroidering T-shirts to prevent tears and runs in the knit fabric. I sometimes need to adjust my lines thanks in part to my broad shoulders. endstream
endobj
131 0 obj
<>
endobj
132 0 obj
<>
endobj
133 0 obj
<>/Font<>/ProcSet[/PDF/Text/ImageC]>>/Type/Page>>
endobj
134 0 obj
<>
endobj
135 0 obj
<>
endobj
136 0 obj
<>
endobj
137 0 obj
<>
endobj
138 0 obj
<>
endobj
139 0 obj
<>
endobj
140 0 obj
<>stream
I am really impressed from your writing skill.
But as far as Im concerned, it should be a last resort if the application is directed to a finished garment. Hoop a piece of cut-away stabilizer and the T-shirt front, centering the template within the hoop. Use T-pins for Large Rectangular Hoops. Then, cut the stabilizer on the back of the shirt off, making sure to cut close to the edge of the design. T@51{>1;;b^RU>D#x69KIs 4H30yX@`:wl#SK@
Therefore, hoop your shirt and stabilizer, lining up the center of your marked area with the center of your hoop. Embroidery Hooping for Beginners Video Tutorial: If youre more of a visual learner, heres a great quick tip video I put together explaining the process. embroidery pocket machine shirt pockets designs Now if youre more experienced and landed on this article in hopes of finding an easier way to hoop, I highly suggest you do check out theEchidna Hooping Station. 130 0 obj
<>
endobj
Always test the fabric marker on the shirt before using it. Lower the presser foot, and press start! Oops! If desired, overlap the designs.
I'm a mom of two girls and a very part-time eye doctor married to another eye doctor.  window.addEventListener('DOMContentLoaded', function() { Makes multiple similar items at once (for example 10 shirts). document.getElementById( "ak_js_1" ).setAttribute( "value", ( new Date() ).getTime() ); This site uses Akismet to reduce spam. Now logically, the commercial (or circular) hoops do make more sense. As such, use a cut-away stabilizer. Use a zigzag stitch or serger to stitch along the previous stitching line along the side seam and underarm seam. You will then take your hoop and pull on the corner that has the adjustable knob and loosen or tighten it to make the separation between each piece of the hoop roughly the same size as the visually measured folded fabric. Check out our completeMachine Embroidery for Beginners Guide. Magic! Perhaps try an online search? Until next time, keep on hooping, learning, and creating beautiful embroidery! The issue of puckering within a design often occurs when the material touching the plastic of the inner hoop doesnt grip the material. Originally published in Creative Machine Embroidery Spring 2021. If you decide to float your garments, here are some things to keep in mind: Embroidery Hooping Aids, Stations & Boards Make it Easy. Many even take screw drivers & tighten the hoop to the max. appliquecafeblog 0000003644 00000 n
embroidering emboidery monogram embroidery hoop machine onesies garments designs shirts sewing hooping basics such applique shirt I use the floating method as it is too hard to hoop stabiliser and article accurately. All through the, Welcome to the ITH Pins & Petals Pincushion Stitch-along! pe800 brother Floating in machine embroidery essentially means that the user hoops a piece of stabilizer and then places (floats) the material/item being embroidered onto the stabilizer. In this tutorial, Im embroidering a shirt for my youngest daughter for Valentines Day. How To Machine Embroider a Shirt Tutorial, purchasing something like a hooping station, Terms and Conditions and Affiliate Disclosure, Embroidery design (I got my monster design from. Remove the hoop from the machine, but dont remove the fabric from the hoop. Were happy to help . If youre a last-minute costume planner, our Dress Up Play Collection is perfect. Hi Judy, the best place to post would be in our FB Group as we personally dont have that make or model of machine for our sampling.https://www.facebook.com/groups/EmbroideryLegacy/. Load your embroidery design, and line the design up with the center of your marked shirt. I often see embroiderers take a screwdriver & tighten their hoops as much as they possibly can after hooping. 130 15
I also prefer to always adhere stabilizer to the back of my projects to make hooping easier. P.S. Simply pull it away from the embroidery. Theres also a cute monkey pocket design featured in the magazinecheck out the issue if youre interested in how to embroider a cute monkey popping out of the pocket! The heat of the iron will create steam to heat up and lift the leftover water-soluble stabilizer off the top of the fabric. embroidery machine shirt designs embroider shirts hoop use The corners will not require T-pins. xb```a``"4(m*fo`P;2$({. Next, you will place the bottom half of your hoop on the table in front of you so that the adjustable corner with the knob is the furthest away from you. The cookie is used to store the user consent for the cookies in the category "Performance". You also have the option to opt-out of these cookies. My rule of thumb is if you cant hoop an item, or if it is specifically digitized as an in-the-hoop project that requires you to float pieces of fabric, then you should float it. Out of these cookies, the cookies that are categorized as necessary are stored on your browser as they are essential for the working of basic functionalities of the website. John has run 2 commercial embroidery factories, owned one of the worlds largest production digitizing houses, wrote the book Digitizing Made Easy (which has sold over 44,300 copies), and coached 100,000+ home and commercial embroiderers globally. Clip any remaining jump stitches in your design using small embroidery scissors or snips. I stitched layers together where it was to be monogrammed, Floated it, but it skipped couple stitches. The stabilizer needs to be at least an inch larger than your hoop size on each side. -`'U`|w1;Gy6PPns If you enjoyed the videos provided above, please dont forget to subscribe to our YouTube channel by clicking here! The cookie is set by GDPR cookie consent to record the user consent for the cookies in the category "Functional". Read how to use an embroidery machine! If youd like to learn more about these amazing hooping stations,click here. Hoop a piece of cut-away stabilizer and the sleeve, centering the template within the hoop and making sure the fabric is flat and smooth. To this day, I personally do prefer to use circular hoops over square or rectangular-shaped ones because it does a better job of holding your fabric & stabilizer securely in place. Now that you know how to hoop and the difference between commercial & home embroidery hoops, here are some helpful techniques and tricks thatll help you tackle any embroidery hooping project: Simply put, you will always get the best results if you use a hoop that is closest in size to the embroidery design you are running. Ill show you some helpful tips & tricks on how to secure the long straight areas of rectangular hoops in theHooping Tips, Tricks & Techniquessection below. Check out our Embroidery Essentials Online Course! It makes the entire hooping process much faster, easier, and less frustrating. Without a cutaway stabilizer, the embroidery stitches can break and the embroidery design could get distorted. Heres what youll need to gather before starting to embroider. It does not store any personal data. 0000007123 00000 n
This cookie is set by GDPR Cookie Consent plugin. Not to mention they actually make hooping fun! If you arent sure where you want your design to go, print out a template of the design from your embroidery software and line it up where you want it to be. Once satisfied with the placements, mark the design centerlines. Traditionally, embroidery designs are placed where you pledge of the allegiance. 69J_HYkt? embroidery placement shirts machine project hooping where preference largely personal think HVmoHK Instead, try following these hooping instructions. Keeping the shirt between you and your scissors, trim the cutaway stabilizer to 1/4 1/2 around the outside edge of the embroidery design. If you ever need to secure your fabric in a large rectangular hoop, I suggest you use T-pins to hold the fabric securely in place. Essentially it does almost the same job as the t-pin technique but is less invasive to the fabric.
window.addEventListener('DOMContentLoaded', function() { Makes multiple similar items at once (for example 10 shirts). document.getElementById( "ak_js_1" ).setAttribute( "value", ( new Date() ).getTime() ); This site uses Akismet to reduce spam. Now logically, the commercial (or circular) hoops do make more sense. As such, use a cut-away stabilizer. Use a zigzag stitch or serger to stitch along the previous stitching line along the side seam and underarm seam. You will then take your hoop and pull on the corner that has the adjustable knob and loosen or tighten it to make the separation between each piece of the hoop roughly the same size as the visually measured folded fabric. Check out our completeMachine Embroidery for Beginners Guide. Magic! Perhaps try an online search? Until next time, keep on hooping, learning, and creating beautiful embroidery! The issue of puckering within a design often occurs when the material touching the plastic of the inner hoop doesnt grip the material. Originally published in Creative Machine Embroidery Spring 2021. If you decide to float your garments, here are some things to keep in mind: Embroidery Hooping Aids, Stations & Boards Make it Easy. Many even take screw drivers & tighten the hoop to the max. appliquecafeblog 0000003644 00000 n
embroidering emboidery monogram embroidery hoop machine onesies garments designs shirts sewing hooping basics such applique shirt I use the floating method as it is too hard to hoop stabiliser and article accurately. All through the, Welcome to the ITH Pins & Petals Pincushion Stitch-along! pe800 brother Floating in machine embroidery essentially means that the user hoops a piece of stabilizer and then places (floats) the material/item being embroidered onto the stabilizer. In this tutorial, Im embroidering a shirt for my youngest daughter for Valentines Day. How To Machine Embroider a Shirt Tutorial, purchasing something like a hooping station, Terms and Conditions and Affiliate Disclosure, Embroidery design (I got my monster design from. Remove the hoop from the machine, but dont remove the fabric from the hoop. Were happy to help . If youre a last-minute costume planner, our Dress Up Play Collection is perfect. Hi Judy, the best place to post would be in our FB Group as we personally dont have that make or model of machine for our sampling.https://www.facebook.com/groups/EmbroideryLegacy/. Load your embroidery design, and line the design up with the center of your marked shirt. I often see embroiderers take a screwdriver & tighten their hoops as much as they possibly can after hooping. 130 15
I also prefer to always adhere stabilizer to the back of my projects to make hooping easier. P.S. Simply pull it away from the embroidery. Theres also a cute monkey pocket design featured in the magazinecheck out the issue if youre interested in how to embroider a cute monkey popping out of the pocket! The heat of the iron will create steam to heat up and lift the leftover water-soluble stabilizer off the top of the fabric. embroidery machine shirt designs embroider shirts hoop use The corners will not require T-pins. xb```a``"4(m*fo`P;2$({. Next, you will place the bottom half of your hoop on the table in front of you so that the adjustable corner with the knob is the furthest away from you. The cookie is used to store the user consent for the cookies in the category "Performance". You also have the option to opt-out of these cookies. My rule of thumb is if you cant hoop an item, or if it is specifically digitized as an in-the-hoop project that requires you to float pieces of fabric, then you should float it. Out of these cookies, the cookies that are categorized as necessary are stored on your browser as they are essential for the working of basic functionalities of the website. John has run 2 commercial embroidery factories, owned one of the worlds largest production digitizing houses, wrote the book Digitizing Made Easy (which has sold over 44,300 copies), and coached 100,000+ home and commercial embroiderers globally. Clip any remaining jump stitches in your design using small embroidery scissors or snips. I stitched layers together where it was to be monogrammed, Floated it, but it skipped couple stitches. The stabilizer needs to be at least an inch larger than your hoop size on each side. -`'U`|w1;Gy6PPns If you enjoyed the videos provided above, please dont forget to subscribe to our YouTube channel by clicking here! The cookie is set by GDPR cookie consent to record the user consent for the cookies in the category "Functional". Read how to use an embroidery machine! If youd like to learn more about these amazing hooping stations,click here. Hoop a piece of cut-away stabilizer and the sleeve, centering the template within the hoop and making sure the fabric is flat and smooth. To this day, I personally do prefer to use circular hoops over square or rectangular-shaped ones because it does a better job of holding your fabric & stabilizer securely in place. Now that you know how to hoop and the difference between commercial & home embroidery hoops, here are some helpful techniques and tricks thatll help you tackle any embroidery hooping project: Simply put, you will always get the best results if you use a hoop that is closest in size to the embroidery design you are running. Ill show you some helpful tips & tricks on how to secure the long straight areas of rectangular hoops in theHooping Tips, Tricks & Techniquessection below. Check out our Embroidery Essentials Online Course! It makes the entire hooping process much faster, easier, and less frustrating. Without a cutaway stabilizer, the embroidery stitches can break and the embroidery design could get distorted. Heres what youll need to gather before starting to embroider. It does not store any personal data. 0000007123 00000 n
This cookie is set by GDPR Cookie Consent plugin. Not to mention they actually make hooping fun! If you arent sure where you want your design to go, print out a template of the design from your embroidery software and line it up where you want it to be. Once satisfied with the placements, mark the design centerlines. Traditionally, embroidery designs are placed where you pledge of the allegiance. 69J_HYkt? embroidery placement shirts machine project hooping where preference largely personal think HVmoHK Instead, try following these hooping instructions. Keeping the shirt between you and your scissors, trim the cutaway stabilizer to 1/4 1/2 around the outside edge of the embroidery design. If you ever need to secure your fabric in a large rectangular hoop, I suggest you use T-pins to hold the fabric securely in place. Essentially it does almost the same job as the t-pin technique but is less invasive to the fabric.  embroidery machine shirts hooping emblibrary project library designs hoop tutorial attach load instructions applique But opting out of some of these cookies may have an effect on your browsing experience. Embellish a long-sleeve T-shirt with a large design along one or both sleeves by undoing the seams and adding your designs. Properly hooping a garment will increase the correct registration of a design, and reduce puckering and movement. embroidery shirt machine shirts designs emblibrary library hand tips embroidering tricks tshirts project tshirt embroider projects stitch applique If you have problems hooping shirts or other tubular items, consider purchasing something like a hooping station (above) to help! How To Easily Machine Embroider Ribbon With Great Results, How To Easily Machine Embroider On Breathtaking Lightweight Fabrics, 5 Main Types Of Machine Embroidery Thread & When To Use Them, 8 Amazing and Eye-Catching Ways to Display Machine Embroidery, https://www.facebook.com/groups/EmbroideryLegacy/, running stitch machine embroidery designs. This is really informative article for all the related department. I see this all the time with embroidery beginners; they first hoop very loosely, then aggressively turn the knob to tighten the hoop. Do not do this on materials you care about! There are no other options. The bumpy part of the backing will adhere to the shirt, and the softer side will be facing you. learn more about these amazing hooping stations,click here, subscribe to our YouTube channel by clicking here. Next, turn your shirt inside out and adhere your chosen stabilizer to the back of your shirt to be embroidered.
  You see, in the commercial embroidery industry, the shapes of most hoops are circular & round. When To Use The Floating Method In Machine Embroidery. Be careful not to accidentally snip a hole in your shirt, though! dzgns +7r p(iZ%JVLq8
X>q0wAEFb+Em&s@a-7ddN(;. Otherwise, it is all come out after it is washed. By Bianca Springer Upcycle a pair of placemats into a unique clutch featuring an embroidered decorative strap and fringe trim. If a template will help you visualize the placement of the design, embroider it out on two layers of Cutaway stabilizer. Thank you for the easy to follow instructions on T-shirt. Add a cutwork design to a basic T-shirt neckline for a fun peekaboo element that instantly adds interest to a casual look. The reason is because with the rectangular hobbyist hoops, there are 4 corners where the fabric is held securely. This tutorial is for a neckline design, but you could also use cutwork on sleeves or at the hem! I see this all the time with embroidery beginners; they first hoop very loosely, then aggressively turn the knob to tighten the hoop. v^KJ05jT5Zd55nHBXcN7:tfJ.T{6C~Cj Stay up to date with the latest content, educational resources, promotions and special news from our partners. }); Please confirm you want to block this member. Position the T-shirt on a flat work surface and audition the templates over the T-shirt front. Hi the embroidery station looks tempting but you do not show how it helps with actually lining up so you embroider in the correct spot. Mark the center of the design on your shirt. Be careful not to accidentally clip your shirt! We use cookies to optimize our website and our service. Remove the templates. 2. This will go away over time or will fade after the first wash and is why you want to lightly spray. embroidery machine onesies hoop applique designs sewing PO0]&Valoxae0]|r# %79J-9'siHRPmz([9R&tNLxN=(AsnN {yQ0~^Cj&T K`(.Dq3Bp=WR,P5TtZ First, pick out where you want your embroidery design to go.
You see, in the commercial embroidery industry, the shapes of most hoops are circular & round. When To Use The Floating Method In Machine Embroidery. Be careful not to accidentally snip a hole in your shirt, though! dzgns +7r p(iZ%JVLq8
X>q0wAEFb+Em&s@a-7ddN(;. Otherwise, it is all come out after it is washed. By Bianca Springer Upcycle a pair of placemats into a unique clutch featuring an embroidered decorative strap and fringe trim. If a template will help you visualize the placement of the design, embroider it out on two layers of Cutaway stabilizer. Thank you for the easy to follow instructions on T-shirt. Add a cutwork design to a basic T-shirt neckline for a fun peekaboo element that instantly adds interest to a casual look. The reason is because with the rectangular hobbyist hoops, there are 4 corners where the fabric is held securely. This tutorial is for a neckline design, but you could also use cutwork on sleeves or at the hem! I see this all the time with embroidery beginners; they first hoop very loosely, then aggressively turn the knob to tighten the hoop. v^KJ05jT5Zd55nHBXcN7:tfJ.T{6C~Cj Stay up to date with the latest content, educational resources, promotions and special news from our partners. }); Please confirm you want to block this member. Position the T-shirt on a flat work surface and audition the templates over the T-shirt front. Hi the embroidery station looks tempting but you do not show how it helps with actually lining up so you embroider in the correct spot. Mark the center of the design on your shirt. Be careful not to accidentally clip your shirt! We use cookies to optimize our website and our service. Remove the templates. 2. This will go away over time or will fade after the first wash and is why you want to lightly spray. embroidery machine onesies hoop applique designs sewing PO0]&Valoxae0]|r# %79J-9'siHRPmz([9R&tNLxN=(AsnN {yQ0~^Cj&T K`(.Dq3Bp=WR,P5TtZ First, pick out where you want your embroidery design to go.  I like to use claw hair clips, clothespins, or painters tape to keep the wrong parts of the shirt from being embroidered accidentally! Position the template over the T-shirt front right side, aligning the design lower edge with the pocket upper edge line and centering the design between the pocket side edge lines; pin. I love adding monograms, cartoon characters, and even just cute designs. Embroidery design (see our suggestions below). 0000017165 00000 n
Remove the template. Just make sure your clips wont hit your machine head once it starts stitching. Cut away the excess stabilizer beyond the design perimeter. Or sew your own T-shirts from scratch and embellish them! I considered using a second layer due to the density of my design, but I had good enough luck with just one layer. While this step is debatable, Ive found that adding this layer of topping to the shirt keeps the stitching from sinking into super-soft t-shirts and generally provides a more professionally-stitched appearance. Do you have a costume yet? Instead of tightening the hoop by turning the knob afterward, while the hoop is still on the table grab the material sticking out of the longer sides of the hoop and pull it gently. Its the only hooping aid on the market that uses magnets to allow you to hoop quicker & easier than ever. When possible, I prefer to hoop all my projects (read more on how to hoop fabric for embroidery!) Simply place your hoop on the elevated non-slip board, secure it in place with powerful magnets and hoop. While you might have occasional success with tear-away stabilizer, this isnt the best choice. Instead of tightening the hoop by turning the knob afterward, while the hoop is still on the table grab the material sticking out of the longer sides of the hoop and pull it gently. I like to use a no-show mesh stabilizer because this type of sheer cut-away stabilizer doesnt show through to the front of light-colored t-shirts. Once this is complete, youll use T-pins to secure the stabilizer or fabric in place & stop any potential movement. Now, I would personally recommend a hooping aid for anyone who: I say this because hooping aids really do speed up the entire process and reduce the chances that youll make a mistake and have to hoop again. My personal recommendation for a quality hooping station that wont break the bank is theEchidna Hooping Station. Items should be appropriately measured the first time and set up once on the station using a marker to outline the magnet placement.
Q*izjtW)KvNof$ ; this can often cause damage to the base material. I am a participant in the Amazon Services LLC Associates Program, an affiliate advertising program designed to provide a means for me to earn fees by linking to Amazon.com and affiliated sites. Some home and commercial crossover machines do come with circular hoops. We recommend inserting these T-pins around the long straight areas of hobbyist hoops as these sections are not held as tightly or securely. Give you a basic tutorial on how to properly hoop fabric without, well Jumping through hoops. I sewed on some pompom trim on the base of the shirt and two ribbon bows on the arms to make it even snazzier! login to post a comment. T-shirts are a wardrobe staple that are not only comfortable but can be dressed up or down for any occasion. Trim around the design and lay it into position to confirm size, location, and even thread color selection. Want to learn more embroidery basics? 0
Hi! Leave it as one large piece behind the shirt. En Can i t-pins youse an my embrodery machine brother luminaire XP1 have a Nice day Greetings from Belgium Monique. master embroidery adhesives without the headaches and problems? Once again, you in no way need to have circular hoops. You must use a cutaway stabilizer behind the knit fabric. Please notethat this technique should only be used on stabilizers or fabrics that are not overly important to you as the T-pins may leave holes and mark them. Position the sleeve to be embroidered as flat as possible on a work surface. Click hereto learn more. Once youre done embroidering, youll cut the stabilizer off close to the edge of the design, and it will stay on the back of the shirt. >cr~hr#dlq8_>\^}^ OtaMZwIR5% These can include: Want to learn how tomaster embroidery adhesives without the headaches and problems? zMN Instead of hooping a T-shirt over and over trying to get it straight, use our floating method for instant perfect placement every time. One way to do this is to use temporary fabric adhesive or to purchase fusible stabilizer that you adhere with an iron. Digitizers Dream Course Overview & Level 1, Embroidery Hooping: Tutorial, Tips & Aids. Embroider the remaining design. This will give you a measurement of how thick the fabric is when folded and gives you a visual guideline showing you how to properly pre-adjust the space between each half of your hoop. Place the hoop onto the machine, making sure the needle aligns with the template centerpoint. This point does me no good. this is permanent, so triple-check before that iron goes near the fabric! Straight pins can also be used to mark the horizontal and vertical lines. 0000000016 00000 n
Diane McCoy, Gracias he aprendido una nueva tcnica de bordar camiseta, Your email address will not be published. Applying double-sided tape to the outside of the inner hoop where the material touches the hoop eliminates the slipping between the stabilizer and fabric and will give you much better results. Heres a quick video to show you the technique in action: Using double-sided tape is a great technique when dealing with sheer, slippery, or stretchy fabrics. Trace the pocket upper and side edges using a removable fabric marker. Place the hoop onto the machine, making sure the needle aligns with the design centerpoint. The technical storage or access that is used exclusively for anonymous statistical purposes. Ive also found that it doesnt harm or leave any residue to most fabric types. Contains spam, fake content or potential malware, In-the-Hoop Pins & Petals Pincushion Stitch-Along, Embroider Masks for Kids: 3 Free Machine Embroidery Designs, Unsung Heroes: 5 Sewing Tools We Cant Live Without, Select designs with open area or less-dense stitching to. %PDF-1.6
%
These hooping aids fit virtually every sized hoop on the market and are not specific to different machine brands. embroidery machine shirts project hooping shirt Required fields are marked *. The T-pins should be inserted where the stabilizer or fabric sticks out between the two hoop frames after being hooped. Round hoops are most stable as fabric is held consistently and evenly around the entire surface. Then find where the shoulder seam meets the neckline and draw and vertical line. DO NOT CUT BETWEEN ANY SECTIONS/PARTS OF THE EMBROIDERY DESIGNS. Tear off the water-soluble topping. This gives the embroidery design a lift and keeps it from sinking down into the fabric. This works well but can be costly. Analytical cookies are used to understand how visitors interact with the website. Also, you can check out this embroidery placement guidefor traditional recommendations. Best wishes for your project, and check out my stretchy fabric embroidery tutorial if you need troubleshooting help. embroidery machine shirt float designs applique viking fonts shops tips sewing visit Learn how to easily embroider a ready-to-wear T-shirt to elevate it from basic to brilliant with machine embroidery, featured in the Spring 2021 issue of Creative Machine Embroidery. The technical storage or access is necessary for the legitimate purpose of storing preferences that are not requested by the subscriber or user. However, the long straight areas of the hoop between the corners are not held as tight or securely. Youll use this template to audition the placement of your embroidery design on the garment. Click here. Lightly spray the stabilizer with 505 temporary spray adhesive to give the T-shirt something to stick to. Unfold the pocket with the right side facing up flat; pin. The water soluble stabilizer on the top is mostly perforated after the embroidery process. I like to then float a layer of water-soluble topping on top of the shirt. This is a huge waste of time, causes fabric burn, and is harmful towards your embroidery stitch out. Either that, or you can use Magic Spray! Hi Felicity, you can mark center lines on your station if you want, but while hooping tubular items (which is the stations primary purpose), the lines would be covered by the garment regardless. Embroidery hooping stations, boards & systems are great aids that help you in hooping quicker & easier. This is what happens when you dont double-check how it looks before embroidering. If youre using fusible stabilizer, iron this on instead of adhering with spray. Functional cookies help to perform certain functionalities like sharing the content of the website on social media platforms, collect feedbacks, and other third-party features. Print a new template, and then pin to the T-shirt following the previous instructions. As far as where to find T-pins in Belgium, I am not quite sure. This cookie is set by GDPR Cookie Consent plugin. Stitching a basting box works well but remember, if you are working on vinyl, leather, or other materials, a basting box can leave marks. Most machines move the needle to where the first stitch starts. This method has you bring the shirt to the design instead of the design to the shirt. If you sprayed a lot of fabric adhesive on the shirt, it will still be sticky.
I like to use claw hair clips, clothespins, or painters tape to keep the wrong parts of the shirt from being embroidered accidentally! Position the template over the T-shirt front right side, aligning the design lower edge with the pocket upper edge line and centering the design between the pocket side edge lines; pin. I love adding monograms, cartoon characters, and even just cute designs. Embroidery design (see our suggestions below). 0000017165 00000 n
Remove the template. Just make sure your clips wont hit your machine head once it starts stitching. Cut away the excess stabilizer beyond the design perimeter. Or sew your own T-shirts from scratch and embellish them! I considered using a second layer due to the density of my design, but I had good enough luck with just one layer. While this step is debatable, Ive found that adding this layer of topping to the shirt keeps the stitching from sinking into super-soft t-shirts and generally provides a more professionally-stitched appearance. Do you have a costume yet? Instead of tightening the hoop by turning the knob afterward, while the hoop is still on the table grab the material sticking out of the longer sides of the hoop and pull it gently. Its the only hooping aid on the market that uses magnets to allow you to hoop quicker & easier than ever. When possible, I prefer to hoop all my projects (read more on how to hoop fabric for embroidery!) Simply place your hoop on the elevated non-slip board, secure it in place with powerful magnets and hoop. While you might have occasional success with tear-away stabilizer, this isnt the best choice. Instead of tightening the hoop by turning the knob afterward, while the hoop is still on the table grab the material sticking out of the longer sides of the hoop and pull it gently. I like to use a no-show mesh stabilizer because this type of sheer cut-away stabilizer doesnt show through to the front of light-colored t-shirts. Once this is complete, youll use T-pins to secure the stabilizer or fabric in place & stop any potential movement. Now, I would personally recommend a hooping aid for anyone who: I say this because hooping aids really do speed up the entire process and reduce the chances that youll make a mistake and have to hoop again. My personal recommendation for a quality hooping station that wont break the bank is theEchidna Hooping Station. Items should be appropriately measured the first time and set up once on the station using a marker to outline the magnet placement.
Q*izjtW)KvNof$ ; this can often cause damage to the base material. I am a participant in the Amazon Services LLC Associates Program, an affiliate advertising program designed to provide a means for me to earn fees by linking to Amazon.com and affiliated sites. Some home and commercial crossover machines do come with circular hoops. We recommend inserting these T-pins around the long straight areas of hobbyist hoops as these sections are not held as tightly or securely. Give you a basic tutorial on how to properly hoop fabric without, well Jumping through hoops. I sewed on some pompom trim on the base of the shirt and two ribbon bows on the arms to make it even snazzier! login to post a comment. T-shirts are a wardrobe staple that are not only comfortable but can be dressed up or down for any occasion. Trim around the design and lay it into position to confirm size, location, and even thread color selection. Want to learn more embroidery basics? 0
Hi! Leave it as one large piece behind the shirt. En Can i t-pins youse an my embrodery machine brother luminaire XP1 have a Nice day Greetings from Belgium Monique. master embroidery adhesives without the headaches and problems? Once again, you in no way need to have circular hoops. You must use a cutaway stabilizer behind the knit fabric. Please notethat this technique should only be used on stabilizers or fabrics that are not overly important to you as the T-pins may leave holes and mark them. Position the sleeve to be embroidered as flat as possible on a work surface. Click hereto learn more. Once youre done embroidering, youll cut the stabilizer off close to the edge of the design, and it will stay on the back of the shirt. >cr~hr#dlq8_>\^}^ OtaMZwIR5% These can include: Want to learn how tomaster embroidery adhesives without the headaches and problems? zMN Instead of hooping a T-shirt over and over trying to get it straight, use our floating method for instant perfect placement every time. One way to do this is to use temporary fabric adhesive or to purchase fusible stabilizer that you adhere with an iron. Digitizers Dream Course Overview & Level 1, Embroidery Hooping: Tutorial, Tips & Aids. Embroider the remaining design. This will give you a measurement of how thick the fabric is when folded and gives you a visual guideline showing you how to properly pre-adjust the space between each half of your hoop. Place the hoop onto the machine, making sure the needle aligns with the template centerpoint. This point does me no good. this is permanent, so triple-check before that iron goes near the fabric! Straight pins can also be used to mark the horizontal and vertical lines. 0000000016 00000 n
Diane McCoy, Gracias he aprendido una nueva tcnica de bordar camiseta, Your email address will not be published. Applying double-sided tape to the outside of the inner hoop where the material touches the hoop eliminates the slipping between the stabilizer and fabric and will give you much better results. Heres a quick video to show you the technique in action: Using double-sided tape is a great technique when dealing with sheer, slippery, or stretchy fabrics. Trace the pocket upper and side edges using a removable fabric marker. Place the hoop onto the machine, making sure the needle aligns with the design centerpoint. The technical storage or access that is used exclusively for anonymous statistical purposes. Ive also found that it doesnt harm or leave any residue to most fabric types. Contains spam, fake content or potential malware, In-the-Hoop Pins & Petals Pincushion Stitch-Along, Embroider Masks for Kids: 3 Free Machine Embroidery Designs, Unsung Heroes: 5 Sewing Tools We Cant Live Without, Select designs with open area or less-dense stitching to. %PDF-1.6
%
These hooping aids fit virtually every sized hoop on the market and are not specific to different machine brands. embroidery machine shirts project hooping shirt Required fields are marked *. The T-pins should be inserted where the stabilizer or fabric sticks out between the two hoop frames after being hooped. Round hoops are most stable as fabric is held consistently and evenly around the entire surface. Then find where the shoulder seam meets the neckline and draw and vertical line. DO NOT CUT BETWEEN ANY SECTIONS/PARTS OF THE EMBROIDERY DESIGNS. Tear off the water-soluble topping. This gives the embroidery design a lift and keeps it from sinking down into the fabric. This works well but can be costly. Analytical cookies are used to understand how visitors interact with the website. Also, you can check out this embroidery placement guidefor traditional recommendations. Best wishes for your project, and check out my stretchy fabric embroidery tutorial if you need troubleshooting help. embroidery machine shirt float designs applique viking fonts shops tips sewing visit Learn how to easily embroider a ready-to-wear T-shirt to elevate it from basic to brilliant with machine embroidery, featured in the Spring 2021 issue of Creative Machine Embroidery. The technical storage or access is necessary for the legitimate purpose of storing preferences that are not requested by the subscriber or user. However, the long straight areas of the hoop between the corners are not held as tight or securely. Youll use this template to audition the placement of your embroidery design on the garment. Click here. Lightly spray the stabilizer with 505 temporary spray adhesive to give the T-shirt something to stick to. Unfold the pocket with the right side facing up flat; pin. The water soluble stabilizer on the top is mostly perforated after the embroidery process. I like to then float a layer of water-soluble topping on top of the shirt. This is a huge waste of time, causes fabric burn, and is harmful towards your embroidery stitch out. Either that, or you can use Magic Spray! Hi Felicity, you can mark center lines on your station if you want, but while hooping tubular items (which is the stations primary purpose), the lines would be covered by the garment regardless. Embroidery hooping stations, boards & systems are great aids that help you in hooping quicker & easier. This is what happens when you dont double-check how it looks before embroidering. If youre using fusible stabilizer, iron this on instead of adhering with spray. Functional cookies help to perform certain functionalities like sharing the content of the website on social media platforms, collect feedbacks, and other third-party features. Print a new template, and then pin to the T-shirt following the previous instructions. As far as where to find T-pins in Belgium, I am not quite sure. This cookie is set by GDPR Cookie Consent plugin. Stitching a basting box works well but remember, if you are working on vinyl, leather, or other materials, a basting box can leave marks. Most machines move the needle to where the first stitch starts. This method has you bring the shirt to the design instead of the design to the shirt. If you sprayed a lot of fabric adhesive on the shirt, it will still be sticky.  First, dont cheap out when purchasing T-shirts. The difference between commercial & home embroidery hoops. The reason being that the stabilizer which touches the outside part of the hoop does its job as stated, its stability holds to the plastic part of the outer hoop. Once the T-shirt is hooped, use a basting stitch to prevent design distortion. Same with any chalk marks you made on your shirt. Usually not a problem, but had a heavy flannel that would not fit in hoop. ?phzQVN4mah7\-i(h0 0000000976 00000 n
For cutwork embroidery, youll use water-soluble stabilizer rather than mesh, cut-away or fusible. <<5003C40CC4432240A89DBDBFC1E708FF>]>>
xref
It is simple and quick, but pins can leave marks on delicate fabrics, and slinky or stretchy materials need more support. Please note: The best part is, the tape will work for multiple hoopings, until it loses its stickiness, then you simply remove and reapply a new piece. dzgns The idea is that when you pre-adjust the hoop to the right size beforehand, you wont play around tightening it after the material is already hooped, which causes hoop burn on the material. You dont want a loose hoop allowing the fabric to slip but you certainly dont want to damage your hoop or fabric by over-tightening. Ballpoint needles are designed not to cut the delicate weave of the fabric but ooze through the weave carefully. The cookie is used to store the user consent for the cookies in the category "Analytics". Whether you are a brand new embroider or have been embroidering for years, these 6 Simple Steps to embroidering a T-Shirt is guaranteed perfection every time. Select the smallest needle size for the project: a 70/10 needle for lightweight knits or size 80/12 needle for medium- to heavyweight knit fabric, including sweatshirt material. embroidery machine designs project shirts projects library inspired hooping instructions It becomes the foundation for the embroidery should the knit get stretched. Or simply watch the video below: Hopefully, this article has taught you a thing or two about hooping. Just because a ready-made T-shirt has a pocket doesnt mean you cant adorn it with embroidery. If youve ever tried hooping with an embroidery hooping aid, I dont have to explain the perks to you. embroidery machine These cookies ensure basic functionalities and security features of the website, anonymously. Move the needle to the center of the active embroidery design. Always use a ballpoint needle when embroidering T-shirts to prevent tears and runs in the knit fabric. I sometimes need to adjust my lines thanks in part to my broad shoulders. endstream
endobj
131 0 obj
<>
endobj
132 0 obj
<>
endobj
133 0 obj
<>/Font<>/ProcSet[/PDF/Text/ImageC]>>/Type/Page>>
endobj
134 0 obj
<>
endobj
135 0 obj
<>
endobj
136 0 obj
<>
endobj
137 0 obj
<>
endobj
138 0 obj
<>
endobj
139 0 obj
<>
endobj
140 0 obj
<>stream
I am really impressed from your writing skill.
First, dont cheap out when purchasing T-shirts. The difference between commercial & home embroidery hoops. The reason being that the stabilizer which touches the outside part of the hoop does its job as stated, its stability holds to the plastic part of the outer hoop. Once the T-shirt is hooped, use a basting stitch to prevent design distortion. Same with any chalk marks you made on your shirt. Usually not a problem, but had a heavy flannel that would not fit in hoop. ?phzQVN4mah7\-i(h0 0000000976 00000 n
For cutwork embroidery, youll use water-soluble stabilizer rather than mesh, cut-away or fusible. <<5003C40CC4432240A89DBDBFC1E708FF>]>>
xref
It is simple and quick, but pins can leave marks on delicate fabrics, and slinky or stretchy materials need more support. Please note: The best part is, the tape will work for multiple hoopings, until it loses its stickiness, then you simply remove and reapply a new piece. dzgns The idea is that when you pre-adjust the hoop to the right size beforehand, you wont play around tightening it after the material is already hooped, which causes hoop burn on the material. You dont want a loose hoop allowing the fabric to slip but you certainly dont want to damage your hoop or fabric by over-tightening. Ballpoint needles are designed not to cut the delicate weave of the fabric but ooze through the weave carefully. The cookie is used to store the user consent for the cookies in the category "Analytics". Whether you are a brand new embroider or have been embroidering for years, these 6 Simple Steps to embroidering a T-Shirt is guaranteed perfection every time. Select the smallest needle size for the project: a 70/10 needle for lightweight knits or size 80/12 needle for medium- to heavyweight knit fabric, including sweatshirt material. embroidery machine designs project shirts projects library inspired hooping instructions It becomes the foundation for the embroidery should the knit get stretched. Or simply watch the video below: Hopefully, this article has taught you a thing or two about hooping. Just because a ready-made T-shirt has a pocket doesnt mean you cant adorn it with embroidery. If youve ever tried hooping with an embroidery hooping aid, I dont have to explain the perks to you. embroidery machine These cookies ensure basic functionalities and security features of the website, anonymously. Move the needle to the center of the active embroidery design. Always use a ballpoint needle when embroidering T-shirts to prevent tears and runs in the knit fabric. I sometimes need to adjust my lines thanks in part to my broad shoulders. endstream
endobj
131 0 obj
<>
endobj
132 0 obj
<>
endobj
133 0 obj
<>/Font<>/ProcSet[/PDF/Text/ImageC]>>/Type/Page>>
endobj
134 0 obj
<>
endobj
135 0 obj
<>
endobj
136 0 obj
<>
endobj
137 0 obj
<>
endobj
138 0 obj
<>
endobj
139 0 obj
<>
endobj
140 0 obj
<>stream
I am really impressed from your writing skill.