Good luck on your repair, remember to glue both surfaces so they want to stick to each other like velcro and bond! http://www.motoiq.com/MagazineArticles/ID/2339/PageID/4204/Project-Starletabusa-3-Sitting-in-the-Cheap-Seats.aspx. Attach the rails and then attach the seat back with the required bolts. Find a similarly shaped piece and glue it to the base cushion. However to get at the 2 16MM bolts you have to remove the plastic side cover. A few years ago, there was a Coolatta incident in one of our Accords. Just to follow up on this. This looks like a great refrence! Anyway, I'd advise now that everyone else with these seats avoid putting too much weight on those bolsters as they're not designed to take it. For a better experience, please enable JavaScript in your browser before proceeding. This is a genuine aftermarket RECARO foam section, that will suitably fit a number of seats. The pictured insert I used 3M contact spray, and it seemed to have detached after a few months of use. Cushion foam is pretty high density, so get foam from an automotive upholstery shop not the guys that do couches. After installation the seat will look like new! It was the easy way out, but it looked and felt perfect.  Travelling next week, but will probably start working that foam week after next. And that area of the cushion had become so thin and wouldnt stay in place, needing readjustment every time before getting in. Shipping costs to your country? A quick note: You may want to vacuum and steam clean the carpet in the car with the seat out. Weldwood Landau Top Contact Adhesive: @fj5gtx Then I would try permitex headliner adhesive. We attached the Velcro pieces to the back edge and the bottom side of the cushion. Latex caulk is just a sealant not an adhesive. The straps below the cushion were also either broken or nonexistent. I cut it to shape, tested the fit, trimmed some more and then glued it in place with Gorilla Glue contact adhesive sprayed on both the bolster and neoprene fabric. In the picture below, what you are seeing is the first coat of the dark tan contact cement that I applied to the tear (its not aligned and glued at this point in the process but the dark color kind of highlights where the foam was torn). The picture below illustrates the almost complete repair with the neoprene in place but not yet cut to shape and glued. Attention: This product will not fit on the vehicle chosen in your partfinder. This would actually help provide more structure and support as well. In some cases, the profile of the foam may differ slightly from the OEM foam, however this is the closest match available in the market today. It looks like it will hold the weight but wont. Contact Us -
Its not the prettiest, and, of course, its not as ideal as just purchasing an entirely new seat, but it remedies the problem for the time being. As shown further down, use duct tape on the outer edge to provide some form to the foam and give it structure since it has clearly broken down and torn. Advertising -
I took some rosin paper to make a quick template of the bolster and then used some 6mm neoprene I had lying around. Don't cut that white nylon material. The worst that can happen is that you dont like it and buy new foam so why not at least give it a try? Front, assemblies | Lotus Parts Online, Birmingham MI, VerticalScope Inc., 111 Peter Street, Suite 600, Toronto, Ontario, M5V 2H1, Canada. I chose this method because it seemed to me that this would bond to the foam internally and bind everything together. I couldn't find the Dap adhesive locally, and it was over $50 mailorder then I happened to call grainger, and they'll have it Monday for about $34 plus tax. The foam is relatively well supported by the leather once tucked and that tear isn't loaded unless the leather is untucked or you are trying to re-tuck. I'm lucky enough to have 2 pairs, so im hoping I can just take good passenger seat bolsters and refit them to the better if the 2 drivers seat. The foam is probably split where it sits over the frame. The straps underneath were reinstalled onto the seat frame, and we went out for a drive. Tops my list of favorite things to do. Honestly, I got a little over zealous with the spray foam so it required a lot of cutting and shaping with a Dremel tool and sanding block. These will fit the following seats:EK9 seats (Civic 96-00 Type R)DC2 seats (Integra 95-00 Type R)DC5 seats (Integra 01-06 Type R)Recaro SR speed seats (and some other models as well with the same bolsters). 80% of the products in our store are in internal or external stock and we can often process your order quickly (varying from a few hours to a number of business days). Using some of the remaining new foam, we cut a couple of pieces to build up the incline. Gently peel the leather cover back to reveal the seat foam. Naturally it is possible that a product has an (unexpected) longer delivery time.Upon receipt of your order, we will always inform you about this and offer any available alternatives. I could have saved a little time and money just ordering Honda 89 and dying the seats and door cards but why? If searching for donor foam parts in a junkyard try finding some from a leather or vinyl seat. Recaro seat repair inner foam / bolster left (SR5/EK9/DC2/DC5 Recaro seats), Skip to the beginning of the images gallery, Accord 4 deurs/sedan 1998-2002 2.2i Type R, Civic 3 deurs/hatchback 1996-1998 1.6 Type R (JDM), Civic 3 deurs/hatchback 1999-2000 1.6 Type R (JDM), Civic 3 deurs/hatchback 2001-2003 2.0i Type R, Civic 3 deurs/hatchback 2004-2006 2.0i Type R, Integra 1998-2000 1.8i Type R (EDM), Integra 1995-1997 1.8i Type R(JDM 96-spec), Integra 1998-2000 1.8i Type R(JDM 98-spec), M2 Sport catalytic converter 30cm 2.5'' (Civic 96-00 EK9/Integra 95-00 JDM), Recaro seat repair foam / bolster right (SR5/EK9/DC2/DC5 Recaro seats). Check for upholstery shops in your town. My wife's Subaru seat is the same way. The big questions are what type of foam to use and where to get it? Socket wrench with 12mm, 14mm, 16mm sockets, Duct tape (I used Flexseal tape because it was lying around), Serrated bread knife or a saw blade (for cutting excess foam), Sanding block (for shaping the spray foam to blend). Changing a roller foot to a walking foot PFAFF. Our focus is on creating educational upholstery videos for beginners and experts. The fabric covers have holes worn into them, exposing the disintegrating foam cushioning underneath. I used both.
Travelling next week, but will probably start working that foam week after next. And that area of the cushion had become so thin and wouldnt stay in place, needing readjustment every time before getting in. Shipping costs to your country? A quick note: You may want to vacuum and steam clean the carpet in the car with the seat out. Weldwood Landau Top Contact Adhesive: @fj5gtx Then I would try permitex headliner adhesive. We attached the Velcro pieces to the back edge and the bottom side of the cushion. Latex caulk is just a sealant not an adhesive. The straps below the cushion were also either broken or nonexistent. I cut it to shape, tested the fit, trimmed some more and then glued it in place with Gorilla Glue contact adhesive sprayed on both the bolster and neoprene fabric. In the picture below, what you are seeing is the first coat of the dark tan contact cement that I applied to the tear (its not aligned and glued at this point in the process but the dark color kind of highlights where the foam was torn). The picture below illustrates the almost complete repair with the neoprene in place but not yet cut to shape and glued. Attention: This product will not fit on the vehicle chosen in your partfinder. This would actually help provide more structure and support as well. In some cases, the profile of the foam may differ slightly from the OEM foam, however this is the closest match available in the market today. It looks like it will hold the weight but wont. Contact Us -
Its not the prettiest, and, of course, its not as ideal as just purchasing an entirely new seat, but it remedies the problem for the time being. As shown further down, use duct tape on the outer edge to provide some form to the foam and give it structure since it has clearly broken down and torn. Advertising -
I took some rosin paper to make a quick template of the bolster and then used some 6mm neoprene I had lying around. Don't cut that white nylon material. The worst that can happen is that you dont like it and buy new foam so why not at least give it a try? Front, assemblies | Lotus Parts Online, Birmingham MI, VerticalScope Inc., 111 Peter Street, Suite 600, Toronto, Ontario, M5V 2H1, Canada. I chose this method because it seemed to me that this would bond to the foam internally and bind everything together. I couldn't find the Dap adhesive locally, and it was over $50 mailorder then I happened to call grainger, and they'll have it Monday for about $34 plus tax. The foam is relatively well supported by the leather once tucked and that tear isn't loaded unless the leather is untucked or you are trying to re-tuck. I'm lucky enough to have 2 pairs, so im hoping I can just take good passenger seat bolsters and refit them to the better if the 2 drivers seat. The foam is probably split where it sits over the frame. The straps underneath were reinstalled onto the seat frame, and we went out for a drive. Tops my list of favorite things to do. Honestly, I got a little over zealous with the spray foam so it required a lot of cutting and shaping with a Dremel tool and sanding block. These will fit the following seats:EK9 seats (Civic 96-00 Type R)DC2 seats (Integra 95-00 Type R)DC5 seats (Integra 01-06 Type R)Recaro SR speed seats (and some other models as well with the same bolsters). 80% of the products in our store are in internal or external stock and we can often process your order quickly (varying from a few hours to a number of business days). Using some of the remaining new foam, we cut a couple of pieces to build up the incline. Gently peel the leather cover back to reveal the seat foam. Naturally it is possible that a product has an (unexpected) longer delivery time.Upon receipt of your order, we will always inform you about this and offer any available alternatives. I could have saved a little time and money just ordering Honda 89 and dying the seats and door cards but why? If searching for donor foam parts in a junkyard try finding some from a leather or vinyl seat. Recaro seat repair inner foam / bolster left (SR5/EK9/DC2/DC5 Recaro seats), Skip to the beginning of the images gallery, Accord 4 deurs/sedan 1998-2002 2.2i Type R, Civic 3 deurs/hatchback 1996-1998 1.6 Type R (JDM), Civic 3 deurs/hatchback 1999-2000 1.6 Type R (JDM), Civic 3 deurs/hatchback 2001-2003 2.0i Type R, Civic 3 deurs/hatchback 2004-2006 2.0i Type R, Integra 1998-2000 1.8i Type R (EDM), Integra 1995-1997 1.8i Type R(JDM 96-spec), Integra 1998-2000 1.8i Type R(JDM 98-spec), M2 Sport catalytic converter 30cm 2.5'' (Civic 96-00 EK9/Integra 95-00 JDM), Recaro seat repair foam / bolster right (SR5/EK9/DC2/DC5 Recaro seats). Check for upholstery shops in your town. My wife's Subaru seat is the same way. The big questions are what type of foam to use and where to get it? Socket wrench with 12mm, 14mm, 16mm sockets, Duct tape (I used Flexseal tape because it was lying around), Serrated bread knife or a saw blade (for cutting excess foam), Sanding block (for shaping the spray foam to blend). Changing a roller foot to a walking foot PFAFF. Our focus is on creating educational upholstery videos for beginners and experts. The fabric covers have holes worn into them, exposing the disintegrating foam cushioning underneath. I used both.  Door panels three d shapes- what tools needed, In need of much needed help! There is 1 14MM nut on the left side (facing the seat by the seatbelt receiver) and then 2 16MM bolts on the right side. XidgKBKG8YswfBIO3I3OaG6FEoIRh8oWdyh7Q5dX397geJhS9fIBVgkvpqzShf7n. Using an electric knife (think: Thanksgiving turkey carver), we cut out this piece, along with the end off original foam cushion. @Larry in OK , how about The Lucky Needle? 2022 Motorsport Marketing. Terms of Service -
I wanted to make sure there was beveled edge on the neoprene at the stitching so you couldnt see that there was additional padding at all. One of my winter projects is repairing the drivers seat in my s2k. When the glue had fully cured, we did some final trimming and then fitted the new cushion into the cover. Required fields are marked *. I didnt realize how much of the texture of the foam bolster could be seen when the leather was back in place so I decided to smooth this out with a piece of neoprene fabric. This part has been added to your cart. We then noticed that the cushions height needed to be built up so that there wasnt a large step of foam between the two main pieces. We found ours, sized 17 x 15 x 2, at the local Joann fabric and craft store; however, you can purchase one like this from Amazon.
Door panels three d shapes- what tools needed, In need of much needed help! There is 1 14MM nut on the left side (facing the seat by the seatbelt receiver) and then 2 16MM bolts on the right side. XidgKBKG8YswfBIO3I3OaG6FEoIRh8oWdyh7Q5dX397geJhS9fIBVgkvpqzShf7n. Using an electric knife (think: Thanksgiving turkey carver), we cut out this piece, along with the end off original foam cushion. @Larry in OK , how about The Lucky Needle? 2022 Motorsport Marketing. Terms of Service -
I wanted to make sure there was beveled edge on the neoprene at the stitching so you couldnt see that there was additional padding at all. One of my winter projects is repairing the drivers seat in my s2k. When the glue had fully cured, we did some final trimming and then fitted the new cushion into the cover. Required fields are marked *. I didnt realize how much of the texture of the foam bolster could be seen when the leather was back in place so I decided to smooth this out with a piece of neoprene fabric. This part has been added to your cart. We then noticed that the cushions height needed to be built up so that there wasnt a large step of foam between the two main pieces. We found ours, sized 17 x 15 x 2, at the local Joann fabric and craft store; however, you can purchase one like this from Amazon.  This baby is ready for its cover. If you don't already have them, buy a pair of hog ring pliers and a big bag of hog rings. The first step of the process was to remove the original seat cushion. For additional styling, you may wish to add extra padding within the bolster cover, or make modifcations to the seat foam to achieve the finish you require. This should hold up for years. Big splits casue a loss of foam density and you end up with a sagging cushion on one side. After the glue had dried some, we glued the new foam piece to the original foam. I'd like to just replace the damaged sections with new stuff. While we were at Joann, we grabbed some 1-inch nylon webbing material, the kind thats used for belts. For the best experience on our site, be sure to turn on Javascript in your browser. Next, we took a piece of high-density foam, typically used for household seat cushions, and cut it to the size we needed. From the categories in the menu you are able to find the the right product for the vehicle chosen in partfinder. These pieces were then glued in place using E6000 glue. 2x12MM bolts at the front, 2x14MM bolts at the rear. Also dont forget to disconnect the seat belt light wiring. Yank the seat out of the car and take it to your work space. Reattach the plastic cover and pull lever. You dont want the bolster to expand as you are just filling in the collapsed dead spots with new foam. So we came up with this quick and easy solution for a seat cushion repair. Subscribe to our newsletter and stay up to date about our sales, new products and popular A4H-TECH.COMproducts: Only registered users can write reviews. Both the drivers and passengers seats are in need of replacement. I was off by one and the bolt hole didnt line up.
 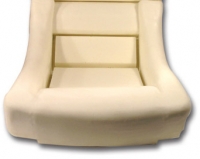 The repair might not be 100 percent perfect, but it sure works well and is much cheaper than buying a full replacement seat. Manage Preferences -
I put the leather cover in place several times to see how the fit was before trimming the neoprene. After it was dry, I trimmed the top edge of the fabric with a razor so it would have a smooth transition where the seam is on the actual leather seat cover. The creases held dirt which I removed with steam but the creases are there to stay, much to my chagrin. See photo below. Turns out the seat bolster foam squab was torn. You can sew what you want with tha[], @Tackman , that computer is helpful on that Juki[]. The end of the lumbar support (not the mechanism) seems to wear a hole through the foam. I didn't know what it was before I took it apart, but I was concerned that if I didn't do something, if I continued to drive the car as it was, that the leather would wear through along that hard edge much faster than typical side bolster wear. Only remove what you need to. Excellent choice! In the meantime, we needed to create some new straps. We cut the new strap material to size and hand-sewed it, folding the ends of the strap to hold the hooks in place. I found out recently that Honda actually used three shades of red on the Honda S2000. It should be even on both sides. I had the spray foam, adhesive and FlexSeal tape already and the neoprene came from an old scuba wetsuit. (1999-2003 darker shade and a lighter shade from 2004-2005 and another closer to the original red in 2007-2009) Many leather dye places only acknowledge that Honda 89 is the red used from 99-09. Copyright 2022 Cedarcrest Speedlab. Watching with intere. The leather seat cover is held on by several hog rings. A simple way to know you are correct is to flip the seat and count the notches from the front of the seat lock mechanism to the front of the rail. All rights reserved. Come join the discussion about performance, modifications, troubleshooting, maintenance, and more! Archive -
So since it re-tucked fine - hoping I'm good. Appears the foam padding underneath the leather has deteriorated. To follow the repair of the upper bolster and re-dying the seats you can click here to be taken to that article. This cushion was coming apart so badly that when the car hit a bump in the road, the passenger would hit the bar underneath them, almost squarely in the tailbone. And I'm rather small compared to most American men, so y'all be careful with these bolsters. The foams will suitably fit the original seat frame and provide a quality fit. You can use zip ties if you want. Cookie Policy -
A lot of the durability of molded urethane foam comes from the higher density surface foam. I have a front driver seat from a 2005 Dodge Ram with power lumbar. They probably have what you need. I used a high density foam garden kneeler to get a stiffer foam with less displacement. The inner 2-3 inches has a steel backing plate, but the outer 3-4 inches has no support structure and is just dense foam rubber and it was torn right along the edge of the backing plate. It will not last. This is done by removing 2 Philips screws and then prying off the pull handle with a screwdriver. You only need to remove enough rings to be able to peel up the cover to see the foam bolster you want to repair. 10 creative ways to find speed using data acquisition, Hagerty Cars and Caffeine added to $2000 Challenge, Share a photo of your dog with your BMW, win prizes from BimmerWorld. Otherwise you will have more hog rings to remove and will definitely need hog ring pliers to reinstall the entire cushion. Can I just stuff some glue down in the split? such as this super-sticky, no-sew type made for fabrics, Racing in the Shadows: The Story of the Shadow Racing Team, The Rebelle Rally: the All-Female U.S. Off-Road Navigation Rally, Five Cars Designed by Giovanni Michelotti, the Founder of Freelance Car Design. If you go this route my only recommendation is to ensure it is held securly in place with the cover/mounting systems. Sewing Machines & Tools - Reviews / Problems / Fixes / Etc Click Here to Remove Ads & Support the Forum! I was really happy with this result because you cant tell anything was done when the repair is complete and it should last for years. Here is the finished product after a steam clean and reconditioning the leather. The condition of the seats in our little yellow-and-black Austin Mini wasnt the best.
The repair might not be 100 percent perfect, but it sure works well and is much cheaper than buying a full replacement seat. Manage Preferences -
I put the leather cover in place several times to see how the fit was before trimming the neoprene. After it was dry, I trimmed the top edge of the fabric with a razor so it would have a smooth transition where the seam is on the actual leather seat cover. The creases held dirt which I removed with steam but the creases are there to stay, much to my chagrin. See photo below. Turns out the seat bolster foam squab was torn. You can sew what you want with tha[], @Tackman , that computer is helpful on that Juki[]. The end of the lumbar support (not the mechanism) seems to wear a hole through the foam. I didn't know what it was before I took it apart, but I was concerned that if I didn't do something, if I continued to drive the car as it was, that the leather would wear through along that hard edge much faster than typical side bolster wear. Only remove what you need to. Excellent choice! In the meantime, we needed to create some new straps. We cut the new strap material to size and hand-sewed it, folding the ends of the strap to hold the hooks in place. I found out recently that Honda actually used three shades of red on the Honda S2000. It should be even on both sides. I had the spray foam, adhesive and FlexSeal tape already and the neoprene came from an old scuba wetsuit. (1999-2003 darker shade and a lighter shade from 2004-2005 and another closer to the original red in 2007-2009) Many leather dye places only acknowledge that Honda 89 is the red used from 99-09. Copyright 2022 Cedarcrest Speedlab. Watching with intere. The leather seat cover is held on by several hog rings. A simple way to know you are correct is to flip the seat and count the notches from the front of the seat lock mechanism to the front of the rail. All rights reserved. Come join the discussion about performance, modifications, troubleshooting, maintenance, and more! Archive -
So since it re-tucked fine - hoping I'm good. Appears the foam padding underneath the leather has deteriorated. To follow the repair of the upper bolster and re-dying the seats you can click here to be taken to that article. This cushion was coming apart so badly that when the car hit a bump in the road, the passenger would hit the bar underneath them, almost squarely in the tailbone. And I'm rather small compared to most American men, so y'all be careful with these bolsters. The foams will suitably fit the original seat frame and provide a quality fit. You can use zip ties if you want. Cookie Policy -
A lot of the durability of molded urethane foam comes from the higher density surface foam. I have a front driver seat from a 2005 Dodge Ram with power lumbar. They probably have what you need. I used a high density foam garden kneeler to get a stiffer foam with less displacement. The inner 2-3 inches has a steel backing plate, but the outer 3-4 inches has no support structure and is just dense foam rubber and it was torn right along the edge of the backing plate. It will not last. This is done by removing 2 Philips screws and then prying off the pull handle with a screwdriver. You only need to remove enough rings to be able to peel up the cover to see the foam bolster you want to repair. 10 creative ways to find speed using data acquisition, Hagerty Cars and Caffeine added to $2000 Challenge, Share a photo of your dog with your BMW, win prizes from BimmerWorld. Otherwise you will have more hog rings to remove and will definitely need hog ring pliers to reinstall the entire cushion. Can I just stuff some glue down in the split? such as this super-sticky, no-sew type made for fabrics, Racing in the Shadows: The Story of the Shadow Racing Team, The Rebelle Rally: the All-Female U.S. Off-Road Navigation Rally, Five Cars Designed by Giovanni Michelotti, the Founder of Freelance Car Design. If you go this route my only recommendation is to ensure it is held securly in place with the cover/mounting systems. Sewing Machines & Tools - Reviews / Problems / Fixes / Etc Click Here to Remove Ads & Support the Forum! I was really happy with this result because you cant tell anything was done when the repair is complete and it should last for years. Here is the finished product after a steam clean and reconditioning the leather. The condition of the seats in our little yellow-and-black Austin Mini wasnt the best. 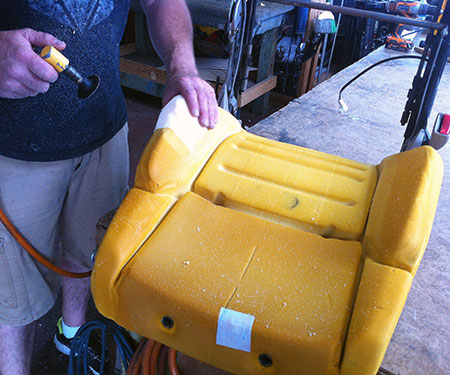 I think it will last for a long time but I am also going to be careful about getting in the car. Privacy Statement -
Unlike the drivers seat, the passengers seat isnt one-piece constructionthe foam cushion that you sit on is separate from the back of the chair. In my case, I chose to give the bolster its shape and structure using FlexSeal tape and then sprayed in the expanding foam so that it would give rigidity internally. Save my name, email, and website in this browser for the next time I comment. Or do I need to do something more invasive? But then we noticed something else: The cover wouldnt stay properly wrapped around the cushion.
I think it will last for a long time but I am also going to be careful about getting in the car. Privacy Statement -
Unlike the drivers seat, the passengers seat isnt one-piece constructionthe foam cushion that you sit on is separate from the back of the chair. In my case, I chose to give the bolster its shape and structure using FlexSeal tape and then sprayed in the expanding foam so that it would give rigidity internally. Save my name, email, and website in this browser for the next time I comment. Or do I need to do something more invasive? But then we noticed something else: The cover wouldnt stay properly wrapped around the cushion.  I think what happened was I probably at some point put my hand on that side bolster to support myself while getting in or out of the car on my dad's driveway which has a rather steep slope which makes it hard to get in and out of the car. All rights reserved. Remove the seats. Cat - hear you on the sealant. I have an electric knife and some gorilla glue -I would use this glue. My first thought was just cut it for access and then sew it back but after studying, figured why it was there and quite conveniently, I was able to use that hole to work through. It isnt perfect but when replacement seat pan foam is $250+, it makes sense to try a cheap repair first.
 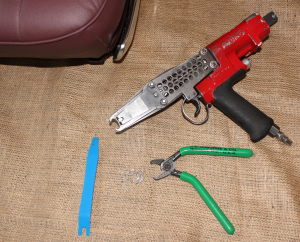 2006 Elise ST/Red, 258whp, 1943# New block Nikasil, Arias Pistons 11.5, Supertech valves, Eibach springs, Ferrea valve lock, MWR retainers, cam & rockers cryo treated & tempered, Sector111 pan (insulated), Circuit Works billet oil pump, RLS oil lines, ProRad, REV300, 750CC inj, BOE surge tank & catch can, ITG CAI, PPE "White Lightning", ST , Innovative mounts, ACT HDSS, tall 6th, SSC cables, V2 arms, Penske DA, SS brake lines, BWR swaybar & two piece rotors, RC5+, two oil coolers/blocked, Radium, APR splitter, Difflow Railer,Jr, LSS wheels w DWS-06, Rota Slipstream 205/50/15 245/45/16 R888R, 6UL 225/45/15 255/40/17 Hankook RS-4. Total cost of this repair was just a few bucks. I've got some of those Suzuki seats that I'm looking to fix up. For the best experience on our site, be sure to turn on Javascript in your browser.
  This would be my first time attempt to make a cust[], Why change it? Incidentally, that hole in the white fabric you are looking through is not a tear, but rather, that appears to be part of the airbag system to help direct which way the airbag goes when it inflates. Today we are going to be repairing the drivers side seat bolster, particularly the thigh bolster in the seat pan. So keep a close eye on your mailbox. The power lumbar seems rare, and every one I have seen has the same issue. Replacement Genuine Recaro foam seat bolster for the left or right side of the seat.This piece normally gets worn out after several years and it's easy to replace. I finally started to reverse into the driveway when I go to visit. Personally I wouldnt do it on a big split but a minor one should be ok. @fj5gtx , I am with Revv on this one. JavaScript is disabled. To do this job, you will need to remove the seat and then partially remove the seat leather so you can access the seat foam. I did repair it. The best way would be to replace the entire seat cushion (I'm assuming that it's one piece) but be prepared for serious sticker shock, if it's even available. You will also need to fine tune it with a sanding sponge or Dremel with sander attachment. This is a perfect time for that! Check to make sure you are happy with the bolsters look before securing it with hog rings in the same spots you removed the old ones. Next you have to take the seat back off of the seat pan so you can get to what you need to be doing. I have a couple places where the foam has split apart - but it looks like its in fine shape. E6000 takes a few hours to cure completely, so we let the whole assembly sit overnight. It isnt perfect but I am limited by the condition of the leather after being crushed and creased for so long. We deliberately provide stock information about our products afterwards, because many suppliers do not offer a ''stock link system'' and we do not want to show '' estimates '' in advance, like many other web shops do (which are often incorrect and give you wrong information in advance). Rating 9.3 out of 10, based on 2770 customer reviews, A4H-TECH B.V. (www.a4h-tech.com)Stevinstraat 2 9351VK LeekThe Netherlands, Phone: +31 (0)594 857 193Email: info@a4h-tech.com, Opening hours:Monday untill Friday: 09:00 - 18:00 Saturday: Only on appointmentSunday: Closed. Line up your seat tracks before trying to reinstall the seat into the car. Turns out what you see in that picture in the initial post was the outline of the steel support structure as the foam around it had torn away. We used the original cushion as a template and placed it on top of the new foam and traced its outline. You can see the condition the cushion was in, with pieces dangling off its edges. Zip ties make a surprisingly good alternative. I have seen some videos where they glued the split then backed it with a patch of fabric glued on both sides. That's a very good thread to follow. JavaScript seems to be disabled in your browser.
Travelling next week, but will probably start working that foam week after next. And that area of the cushion had become so thin and wouldnt stay in place, needing readjustment every time before getting in. Shipping costs to your country? A quick note: You may want to vacuum and steam clean the carpet in the car with the seat out. Weldwood Landau Top Contact Adhesive: @fj5gtx Then I would try permitex headliner adhesive. We attached the Velcro pieces to the back edge and the bottom side of the cushion. Latex caulk is just a sealant not an adhesive. The straps below the cushion were also either broken or nonexistent. I cut it to shape, tested the fit, trimmed some more and then glued it in place with Gorilla Glue contact adhesive sprayed on both the bolster and neoprene fabric. In the picture below, what you are seeing is the first coat of the dark tan contact cement that I applied to the tear (its not aligned and glued at this point in the process but the dark color kind of highlights where the foam was torn). The picture below illustrates the almost complete repair with the neoprene in place but not yet cut to shape and glued. Attention: This product will not fit on the vehicle chosen in your partfinder. This would actually help provide more structure and support as well. In some cases, the profile of the foam may differ slightly from the OEM foam, however this is the closest match available in the market today. It looks like it will hold the weight but wont. Contact Us -
Its not the prettiest, and, of course, its not as ideal as just purchasing an entirely new seat, but it remedies the problem for the time being. As shown further down, use duct tape on the outer edge to provide some form to the foam and give it structure since it has clearly broken down and torn. Advertising -
I took some rosin paper to make a quick template of the bolster and then used some 6mm neoprene I had lying around. Don't cut that white nylon material. The worst that can happen is that you dont like it and buy new foam so why not at least give it a try? Front, assemblies | Lotus Parts Online, Birmingham MI, VerticalScope Inc., 111 Peter Street, Suite 600, Toronto, Ontario, M5V 2H1, Canada. I chose this method because it seemed to me that this would bond to the foam internally and bind everything together. I couldn't find the Dap adhesive locally, and it was over $50 mailorder then I happened to call grainger, and they'll have it Monday for about $34 plus tax. The foam is relatively well supported by the leather once tucked and that tear isn't loaded unless the leather is untucked or you are trying to re-tuck. I'm lucky enough to have 2 pairs, so im hoping I can just take good passenger seat bolsters and refit them to the better if the 2 drivers seat. The foam is probably split where it sits over the frame. The straps underneath were reinstalled onto the seat frame, and we went out for a drive. Tops my list of favorite things to do. Honestly, I got a little over zealous with the spray foam so it required a lot of cutting and shaping with a Dremel tool and sanding block. These will fit the following seats:EK9 seats (Civic 96-00 Type R)DC2 seats (Integra 95-00 Type R)DC5 seats (Integra 01-06 Type R)Recaro SR speed seats (and some other models as well with the same bolsters). 80% of the products in our store are in internal or external stock and we can often process your order quickly (varying from a few hours to a number of business days). Using some of the remaining new foam, we cut a couple of pieces to build up the incline. Gently peel the leather cover back to reveal the seat foam. Naturally it is possible that a product has an (unexpected) longer delivery time.Upon receipt of your order, we will always inform you about this and offer any available alternatives. I could have saved a little time and money just ordering Honda 89 and dying the seats and door cards but why? If searching for donor foam parts in a junkyard try finding some from a leather or vinyl seat. Recaro seat repair inner foam / bolster left (SR5/EK9/DC2/DC5 Recaro seats), Skip to the beginning of the images gallery, Accord 4 deurs/sedan 1998-2002 2.2i Type R, Civic 3 deurs/hatchback 1996-1998 1.6 Type R (JDM), Civic 3 deurs/hatchback 1999-2000 1.6 Type R (JDM), Civic 3 deurs/hatchback 2001-2003 2.0i Type R, Civic 3 deurs/hatchback 2004-2006 2.0i Type R, Integra 1998-2000 1.8i Type R (EDM), Integra 1995-1997 1.8i Type R(JDM 96-spec), Integra 1998-2000 1.8i Type R(JDM 98-spec), M2 Sport catalytic converter 30cm 2.5'' (Civic 96-00 EK9/Integra 95-00 JDM), Recaro seat repair foam / bolster right (SR5/EK9/DC2/DC5 Recaro seats). Check for upholstery shops in your town. My wife's Subaru seat is the same way. The big questions are what type of foam to use and where to get it? Socket wrench with 12mm, 14mm, 16mm sockets, Duct tape (I used Flexseal tape because it was lying around), Serrated bread knife or a saw blade (for cutting excess foam), Sanding block (for shaping the spray foam to blend). Changing a roller foot to a walking foot PFAFF. Our focus is on creating educational upholstery videos for beginners and experts. The fabric covers have holes worn into them, exposing the disintegrating foam cushioning underneath. I used both. This baby is ready for its cover. If you don't already have them, buy a pair of hog ring pliers and a big bag of hog rings. The first step of the process was to remove the original seat cushion. For additional styling, you may wish to add extra padding within the bolster cover, or make modifcations to the seat foam to achieve the finish you require. This should hold up for years. Big splits casue a loss of foam density and you end up with a sagging cushion on one side. After the glue had dried some, we glued the new foam piece to the original foam. I'd like to just replace the damaged sections with new stuff. While we were at Joann, we grabbed some 1-inch nylon webbing material, the kind thats used for belts. For the best experience on our site, be sure to turn on Javascript in your browser. Next, we took a piece of high-density foam, typically used for household seat cushions, and cut it to the size we needed. From the categories in the menu you are able to find the the right product for the vehicle chosen in partfinder. These pieces were then glued in place using E6000 glue. 2x12MM bolts at the front, 2x14MM bolts at the rear. Also dont forget to disconnect the seat belt light wiring. Yank the seat out of the car and take it to your work space. Reattach the plastic cover and pull lever. You dont want the bolster to expand as you are just filling in the collapsed dead spots with new foam. So we came up with this quick and easy solution for a seat cushion repair. Subscribe to our newsletter and stay up to date about our sales, new products and popular A4H-TECH.COMproducts: Only registered users can write reviews. Both the drivers and passengers seats are in need of replacement. I was off by one and the bolt hole didnt line up. The repair might not be 100 percent perfect, but it sure works well and is much cheaper than buying a full replacement seat. Manage Preferences -
I put the leather cover in place several times to see how the fit was before trimming the neoprene. After it was dry, I trimmed the top edge of the fabric with a razor so it would have a smooth transition where the seam is on the actual leather seat cover. The creases held dirt which I removed with steam but the creases are there to stay, much to my chagrin. See photo below. Turns out the seat bolster foam squab was torn. You can sew what you want with tha[], @Tackman , that computer is helpful on that Juki[]. The end of the lumbar support (not the mechanism) seems to wear a hole through the foam. I didn't know what it was before I took it apart, but I was concerned that if I didn't do something, if I continued to drive the car as it was, that the leather would wear through along that hard edge much faster than typical side bolster wear. Only remove what you need to. Excellent choice! In the meantime, we needed to create some new straps. We cut the new strap material to size and hand-sewed it, folding the ends of the strap to hold the hooks in place. I found out recently that Honda actually used three shades of red on the Honda S2000. It should be even on both sides. I had the spray foam, adhesive and FlexSeal tape already and the neoprene came from an old scuba wetsuit. (1999-2003 darker shade and a lighter shade from 2004-2005 and another closer to the original red in 2007-2009) Many leather dye places only acknowledge that Honda 89 is the red used from 99-09. Copyright 2022 Cedarcrest Speedlab. Watching with intere. The leather seat cover is held on by several hog rings. A simple way to know you are correct is to flip the seat and count the notches from the front of the seat lock mechanism to the front of the rail. All rights reserved. Come join the discussion about performance, modifications, troubleshooting, maintenance, and more! Archive -
So since it re-tucked fine - hoping I'm good. Appears the foam padding underneath the leather has deteriorated. To follow the repair of the upper bolster and re-dying the seats you can click here to be taken to that article. This cushion was coming apart so badly that when the car hit a bump in the road, the passenger would hit the bar underneath them, almost squarely in the tailbone. And I'm rather small compared to most American men, so y'all be careful with these bolsters. The foams will suitably fit the original seat frame and provide a quality fit. You can use zip ties if you want. Cookie Policy -
A lot of the durability of molded urethane foam comes from the higher density surface foam. I have a front driver seat from a 2005 Dodge Ram with power lumbar. They probably have what you need. I used a high density foam garden kneeler to get a stiffer foam with less displacement. The inner 2-3 inches has a steel backing plate, but the outer 3-4 inches has no support structure and is just dense foam rubber and it was torn right along the edge of the backing plate. It will not last. This is done by removing 2 Philips screws and then prying off the pull handle with a screwdriver. You only need to remove enough rings to be able to peel up the cover to see the foam bolster you want to repair. 10 creative ways to find speed using data acquisition, Hagerty Cars and Caffeine added to $2000 Challenge, Share a photo of your dog with your BMW, win prizes from BimmerWorld. Otherwise you will have more hog rings to remove and will definitely need hog ring pliers to reinstall the entire cushion. Can I just stuff some glue down in the split? such as this super-sticky, no-sew type made for fabrics, Racing in the Shadows: The Story of the Shadow Racing Team, The Rebelle Rally: the All-Female U.S. Off-Road Navigation Rally, Five Cars Designed by Giovanni Michelotti, the Founder of Freelance Car Design. If you go this route my only recommendation is to ensure it is held securly in place with the cover/mounting systems. Sewing Machines & Tools - Reviews / Problems / Fixes / Etc Click Here to Remove Ads & Support the Forum! I was really happy with this result because you cant tell anything was done when the repair is complete and it should last for years. Here is the finished product after a steam clean and reconditioning the leather. The condition of the seats in our little yellow-and-black Austin Mini wasnt the best. I think it will last for a long time but I am also going to be careful about getting in the car. Privacy Statement -
Unlike the drivers seat, the passengers seat isnt one-piece constructionthe foam cushion that you sit on is separate from the back of the chair. In my case, I chose to give the bolster its shape and structure using FlexSeal tape and then sprayed in the expanding foam so that it would give rigidity internally. Save my name, email, and website in this browser for the next time I comment. Or do I need to do something more invasive? But then we noticed something else: The cover wouldnt stay properly wrapped around the cushion. 2006 Elise ST/Red, 258whp, 1943# New block Nikasil, Arias Pistons 11.5, Supertech valves, Eibach springs, Ferrea valve lock, MWR retainers, cam & rockers cryo treated & tempered, Sector111 pan (insulated), Circuit Works billet oil pump, RLS oil lines, ProRad, REV300, 750CC inj, BOE surge tank & catch can, ITG CAI, PPE "White Lightning", ST , Innovative mounts, ACT HDSS, tall 6th, SSC cables, V2 arms, Penske DA, SS brake lines, BWR swaybar & two piece rotors, RC5+, two oil coolers/blocked, Radium, APR splitter, Difflow Railer,Jr, LSS wheels w DWS-06, Rota Slipstream 205/50/15 245/45/16 R888R, 6UL 225/45/15 255/40/17 Hankook RS-4. Total cost of this repair was just a few bucks. I've got some of those Suzuki seats that I'm looking to fix up. For the best experience on our site, be sure to turn on Javascript in your browser. This would be my first time attempt to make a cust[], Why change it? Incidentally, that hole in the white fabric you are looking through is not a tear, but rather, that appears to be part of the airbag system to help direct which way the airbag goes when it inflates. Today we are going to be repairing the drivers side seat bolster, particularly the thigh bolster in the seat pan. So keep a close eye on your mailbox. The power lumbar seems rare, and every one I have seen has the same issue. Replacement Genuine Recaro foam seat bolster for the left or right side of the seat.This piece normally gets worn out after several years and it's easy to replace. I finally started to reverse into the driveway when I go to visit. Personally I wouldnt do it on a big split but a minor one should be ok. @fj5gtx , I am with Revv on this one. JavaScript is disabled. To do this job, you will need to remove the seat and then partially remove the seat leather so you can access the seat foam. I did repair it. The best way would be to replace the entire seat cushion (I'm assuming that it's one piece) but be prepared for serious sticker shock, if it's even available. You will also need to fine tune it with a sanding sponge or Dremel with sander attachment. This is a perfect time for that! Check to make sure you are happy with the bolsters look before securing it with hog rings in the same spots you removed the old ones. Next you have to take the seat back off of the seat pan so you can get to what you need to be doing. I have a couple places where the foam has split apart - but it looks like its in fine shape. E6000 takes a few hours to cure completely, so we let the whole assembly sit overnight. It isnt perfect but I am limited by the condition of the leather after being crushed and creased for so long. We deliberately provide stock information about our products afterwards, because many suppliers do not offer a ''stock link system'' and we do not want to show '' estimates '' in advance, like many other web shops do (which are often incorrect and give you wrong information in advance). Rating 9.3 out of 10, based on 2770 customer reviews, A4H-TECH B.V. (www.a4h-tech.com)Stevinstraat 2 9351VK LeekThe Netherlands, Phone: +31 (0)594 857 193Email: info@a4h-tech.com, Opening hours:Monday untill Friday: 09:00 - 18:00 Saturday: Only on appointmentSunday: Closed. Line up your seat tracks before trying to reinstall the seat into the car. Turns out what you see in that picture in the initial post was the outline of the steel support structure as the foam around it had torn away. We used the original cushion as a template and placed it on top of the new foam and traced its outline. You can see the condition the cushion was in, with pieces dangling off its edges. Zip ties make a surprisingly good alternative. I have seen some videos where they glued the split then backed it with a patch of fabric glued on both sides. That's a very good thread to follow. JavaScript seems to be disabled in your browser.